
Token Authentication
Core Concepts
Token authentication works by having the user prove his/her identity against some kind of authority (a third party, commonly referred to as an "identity provider"). The authority then issues a document containing user information (the token) along with a signature proving that the document has indeed been issued by the authority.
You've probably already used token authentication in one way or another. Every time you log into some web application by - for example - a "Sign in with Google" or "Sign in with Facebook" button, tokens are being generated in the background.
After obtaining such a token, the client application now sends this token along on each request to the WebTSM Services. When the WebTSM Services instance has been configured to know and trust that particular authority, it uses the information contained in the token.
This has some advantages over traditional Basic authentication:
- Because the token already contains all the required information about the user, no additional requests have to be made to a database on each request.
- Because it relies on an open protocol, user management can be delegated to well known and trusted software and these same users can be used across multiple applications, services, etc.
- Credentials cannot be forged because no one except the authority can create a valid, signed token
- Even if a token is intercepted by an attacker, tokens are usually only valid for a limited time (usually about one hour), further limiting the attackers access to the service.
Examples of Commonly Used Identity Providers
Common services used to authenticate users are
- Microsoft (Azure Active Directory)
- Google (Identity Platform)
- Auth0
- Keycloak
- Okta
The following diagram is a (very basic) representation of the authentication process.
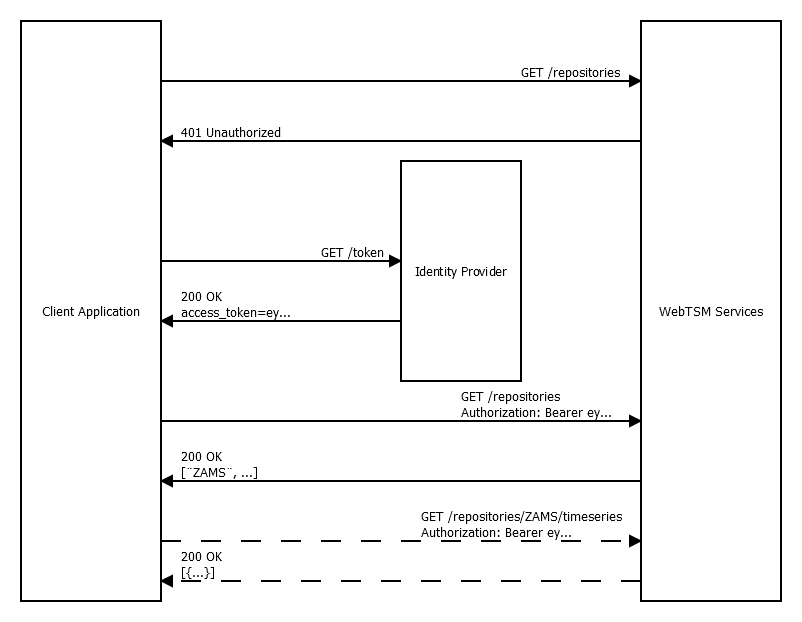
Note that obtaining a token requires the application to transmit credentials to the identity provider in the request against the /token endpoint. The means of transmitting these credentials depends on the type of identity provider.
After some time, the token expires and a "401 Unauthorized" response will be returned by the WebTSM Services, at which point, a new token must be retrieved from the identity provider. More commonly, the client application will request a new token before the current token expires.
Client Types (Trusted vs. Untrusted)
Note that in the example above, the client application has to know the credentials in order to use it in the token request. This is not a problem when the application making the request is running in a secure environment. For example, another service running on a secured server. Especially when the credentials can be retrieved from some kind of dedicated credentials store, environment-variable, etc.
Such clients can be considered "trusted".
If you are developing a purely browser based application, exposing those credentials in Javascript code may introduce serious security vulnerabilities. These are considered "untrusted" applications, because their code and data cannot be trusted to remain confidential.
In these cases, you'd want to prompt the user to enter the credentials themselves. However, prompting the user of your application for credentials for another service and then sending the token request yourself in your code has some important problems:
- It may expose those credentials to attackers (for example via XSS).
- Your users may (and should!) consider this as an attempt of phishing. (Imagine some news website would ask you for your google password. You'd be concerned, wouldn't you?)
Instead, you redirect the user to the identity provider where he/she is prompted for their credentials, which leads to you receiving a valid token from the identity provider (again, via redirects). The following sections explains this process in detail.
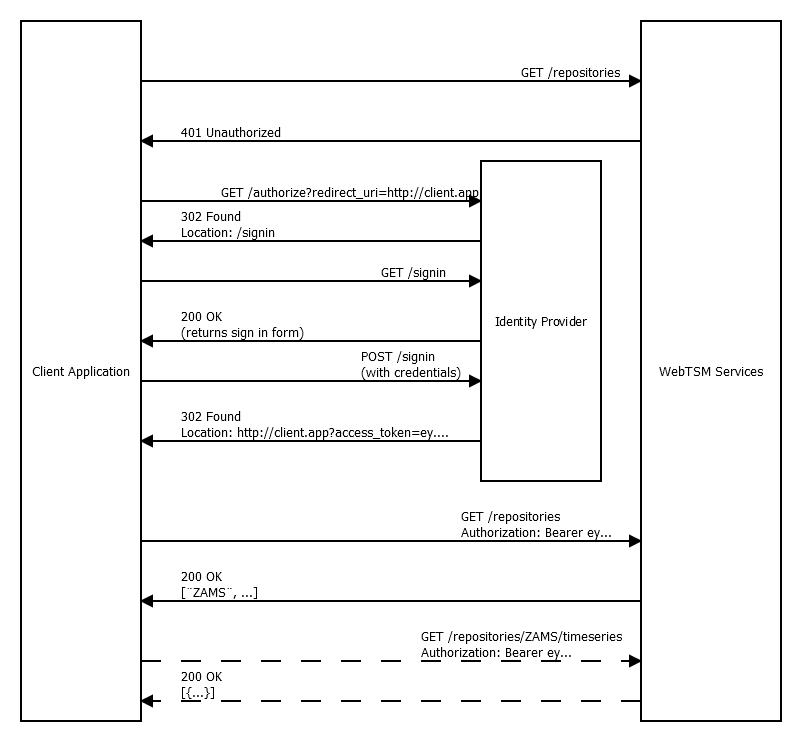
Token Authentication for Untrusted Clients
As mentioned above, token authentication requires the client to store credentials in one way or another. When accessing the WebTSM Services from a browser based web application, this poses a serious security issue, since code containing these credentials cannot be trusted to remain confidential. To help with this issue, another method of authentication is available. This involves a series of browser-redirects during which the (human) user of the application is required to enter the credentials required for authentication. If your web-application is directly accessing the WebTSM Services from javascript code, this would be the method of authentication to use.
First, the client application redirects the user to the identity providers authorization page. There, the user enters his/her credentials in a secure way (it's the identity providers responsibility to ensure this). If the information is correct, the identity provider will issue a token and redirect the user back to the application with the token now present in the URL. After successful authentication and redirection to the original client application the applications code may now extract the access token from the URL and attach it to subsequent requests.
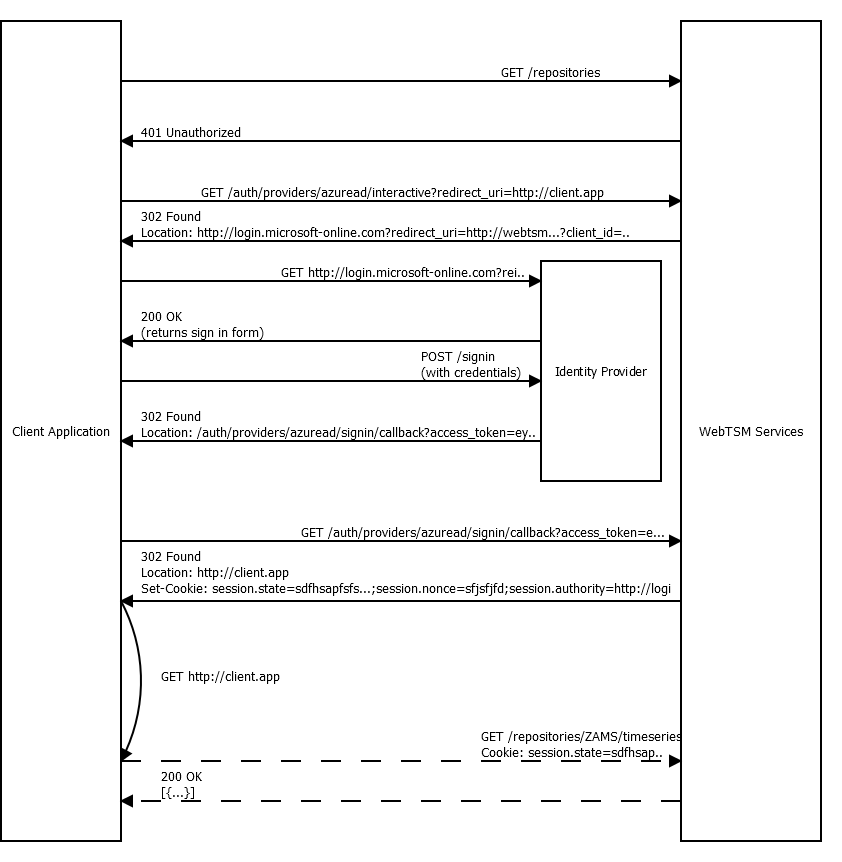
Cookie Authentication
Note that this is merely an extension to the aforementioned authentication method for untrusted clients and still uses cryptographically signed tokens in the background.
First, the client application redirects the user to the WebTSM Services sign-in page for the identity provider. From there, the user is redirected to the identity providers authorization page. Just like before, the user enters his/her credentials in a secure way. If the information is correct, the identity provider will issue a token and redirect the user to the WebTSM Services with the token. The WebTSM Services will then extract the token and stores it in memory, redirecting the user back to the original site he/she came from, but not before setting a cookie that contains encrypted information for the WebTSM Services on how to retrieve the correct token from memory on subsequent requests.
This method is useful if:
- You want to do as little configuration in the web application (only the identity providers name must be known to initiate the process. Everything else is configured at the WebTSM Services end.
- You don't want to be bothered with attaching headers to requests (cookies do this for you).
- You want to make sure user information never leaks into the client application (Unlike the token, the cookie used in this scenario is encrypted and cannot be read).
Types of Identity Providers
There are two types of identity providers:
- External
- Integrated
External Identity Providers
External identity providers are identity providers not maintained and/or developed by HAKOM. This would include Azure Active Directory, KeyCloak, Google, Auth0 etc.
Integrated Identity Providers
There is only one integrated identity provider. This allows the use of credentials stored in and managed by the HAKOM ACL system. When enabled, it runs within the WebTSM Services and provides all the necessary endpoints for generating tokens.
It can be used as an identity provider for
- the very same instance of WebTSM Services it's running within
- another, remote instance of the WebTSM Services
- or even for any other customer application that supports token authentication and simply wants to make use of HAKOMs user storage.
This is also the identity provider to use when wanting to upgrade a client application away from Basic authentication without being forced to install, configure and maintain additional software.
Please note that during sign-in for untrusted applications (see earlier in this document) this identity provider currently uses a very simple Basic authentication challenge during which credentials are transmitted in clear text. Therefor, when using the integrated identity provider, the service should be configured to be accessible only over SSL encrypted connections.
Examples
All the example requests assume that you're attempting to access a service hosted at https://webtsm.hakom.at/v3. Please replace this in your requests with the actual root URL of the Service you're targeting.
Also note that some headers are stripped from the example requests for improved readability.
Summary
- Decide on which identity provider you would like to use
- Obtain a token from the identity provider
- Attach the token to requests sent to the WebTSM Services by inserting it into the Authorization header.
Details
Which identity providers are available for authentication depends on the configuration of the WebTSM Services instance you're intending to access.
GET https://webtsm.hakom.at/v3/api/auth/providersreturns a list of identity providers available to use with the service along with some properties:
[
  {
    "Name": "hakom",
    "Id": "hakom",
    "Issuer": "https://webtsm.hakom.at/v3/api/auth",
    "SignIn": "https://webtsm.hakom.at/v3/api/auth/providers/hakom/interactive",
    "SignOut": "https://webtsm.hakom.at/v3/api/auth/providers/hakom/interactive/signout",
    "Help": null
  },{
    "Name": "AzureAD",
    "Id": "azuread",
    "Issuer": "https://login.microsoftonline.com/ba990f86-1337-4abx-979b-3f3254787ca9/v2.0",
    "SignIn": "https://webtsm.hakom.at/v3/api/auth/providers/azuread/interactive",
    "SignOut": "https://webtsm.hakom.at/v3/api/auth/providers/azuread/interactive/signout",
    "Help": "https://docs.microsoft.com/en-us/azure/active-directory/develop/v2-oauth-ropc"
  }
]
Name
The name of the identity providers for use in GUIs.
Id
The unique id of the provider. Basically a URL-safe version of the name.
Issuer
The unique URL of the provider.
SignIn
A link to initiate interactive signin using cookies for single page applications. Note that you have to add a redirect_uri parameter to the URL.
SignOut
A link to invalidate the current session and cookie. Note that you have to add a redirect_uri parameter to the URL.
Help
When available, may provide information about how to obtain an access token from the identity provider
Examples for Obtaining an Access Token using Raw HTTP Requests
From The Integrated Identity Provider
If the application you are developing can safely protect credentials (server side applications, other webservices, desktop clients using secure key stores, etc.) there are two ways to request a token:
Client credentials
When the operator of the service decides to grant your application access to this service, you should receive
- A client id that identifies your application
- A client secret which you need to authenticate.
Once you have obtained that information, issue a POST request with the credentials in the request body encoded as a query string.
POST https://webtsm.hakom.at/v3/auth/providers/hakom/token HTTP/1.1
Content-Type: application/x-www-form-urlencoded

response_type=token&client_id=[INSERT YOUR CLIENT ID HERE]&client_secret=[INSERT YOUR CLIENT SECRET HERE]&grant_type=client_credentials
Make sure to set the Content-Type header of the request accordingly.
You should receive a response similar to this:
HTTP/1.1 200 OK
Content-Type: application/json;charset=UTF-8

{"scope":"openid email profile","token_type":"Bearer","access_token":"[YOUR ACCESS TOKEN]","expires_in":3600,"id_token":"[AN ID TOKEN]"}
You may then access the WebTSM Services by passing the accesss_token in the Authorization header:
GET https://webtsm.hakom.at/v3/auth/repositories/timeseries/32 HTTP/1.1
Accept: application/json
Authorization: Bearer [YOUR ACCESS TOKEN]
Note that this token is valid for 3600 seconds. You will need to obtain a new token after that time.
Username and Password
The above method for obtaining a token is most suited for applications that run as services under a single user that is not expected to change.
If your application may be used by different users or you would like to be able to change the user, you can use separate credentials to authenticate as a specific user:
POST https://webtsm.hakom.at/v3/auth/providers/hakom/token HTTP/1.1
Content-Type: application/x-www-form-urlencoded

response_type=token&client_id=[INSERT YOUR CLIENT ID HERE]&username=[INSERT YOUR USERNAME HERE]&password=[INSERT YOUR PASSWORD HERE]&grant_type=password
The response will look just like the one above and will include an access token just the same.
If you are developing an application that cannot be trusted with credentials such as a web application, you should use interactive authentication that requires the user to enter the credentials required for obtaining a token.
The most common scenarios are:
- Redirecting the user to the identity provider for authentication in such a way that you end up with a cookie that will then be automatically sent along with all requests to the WebTSM Services.
- Obtaining a token using javascript code and attaching that token on each request.
Using Cookies
Redirect the user to
https://webtsm.hakom.at/v3/api/auth/providers/hakom/interactive?redirect_uri=http://your-web-applicationThe user should be prompted for username and password. When the credentials are correct, the user will be redirected to http://your-web-application
If you would like to give users the ability to sign out, simply redirect the user to the SignOut URL given for the provider. In our case, this would be
https://webtsm.hakom.at/v3/api/auth/providers/hakom/interactive/signout?redirect_uri=http://your-web-applicationUsing javascript
Summary:
- create an new iframe in your web application
set the src to the authorization URL (note the additional parameters!)
CODEhttps://webtsm.hakom.at/v3/api/auth/providers/hakom/authorize?redirect_uri=http://your-auth-handler&response_mode=fragment&response_type=token&client_id=[YOUR CLIENT ID]- This will cause the user to be prompted for credentials.
- Finally, the iframe will be redirected to http://your-auth-handler
- This page should use javascript to inspect the fragment of the location (the part that follows the #, also commonly referred to as the hash-part) which will contain your token
Examples using Postman
Using a Token Obtained From An External Identity Provider
- Obtain an access token. (See the previous section for some examples.)
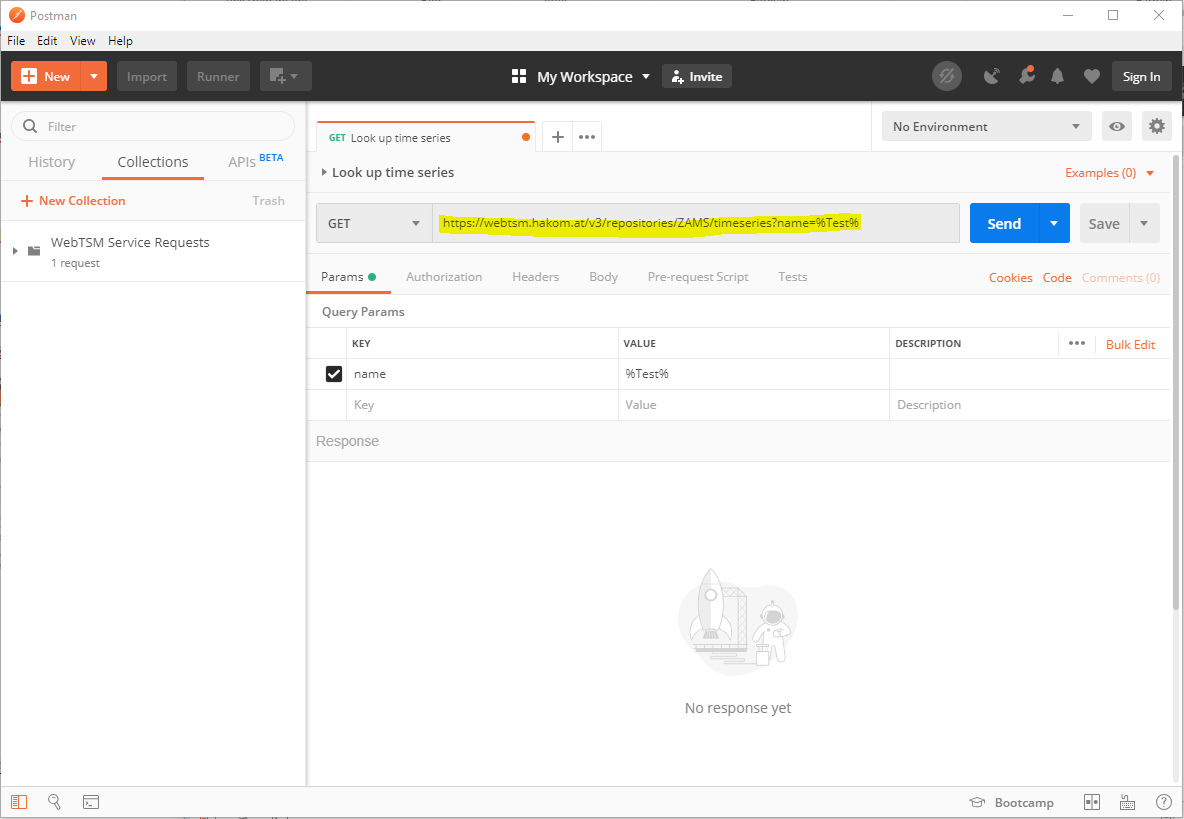
- Create a new request and enter the URL you would like to access

- Switch to the "Authorization" tab and select "Bearer Token"
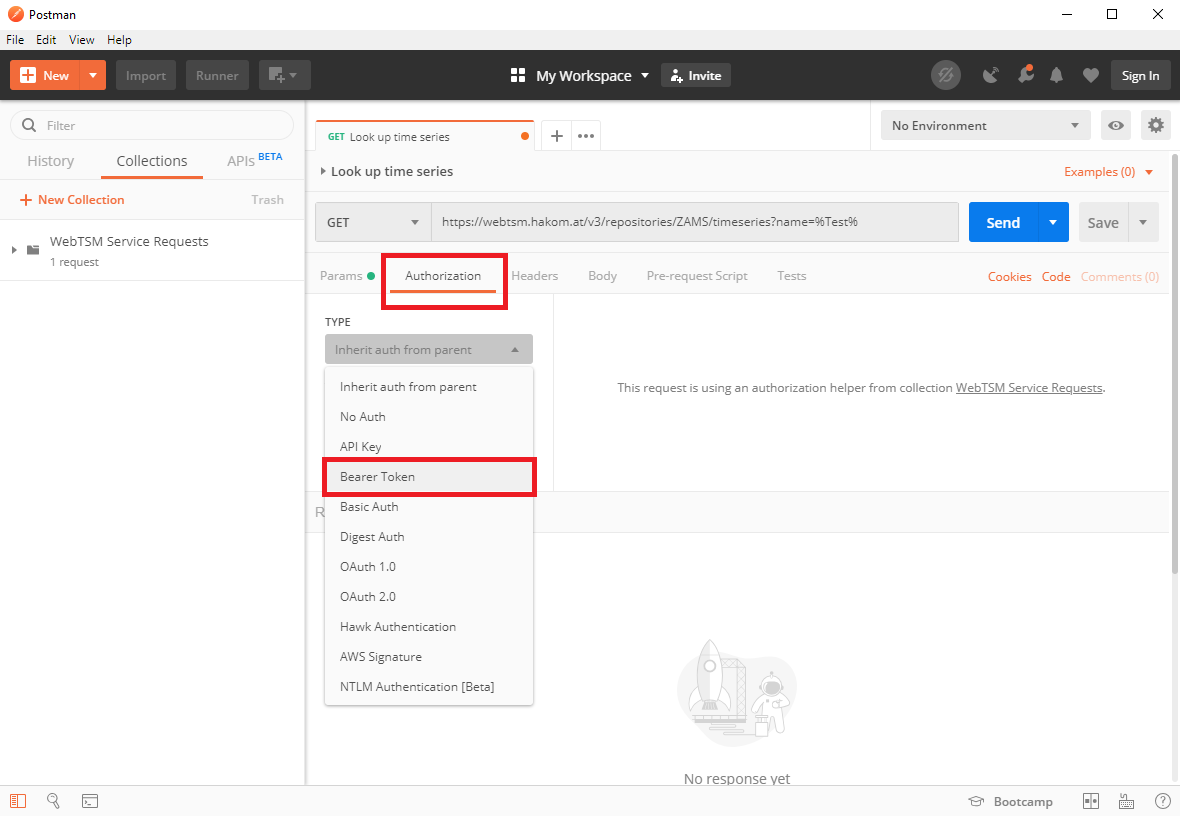
- Insert the token you have received from the identity provider
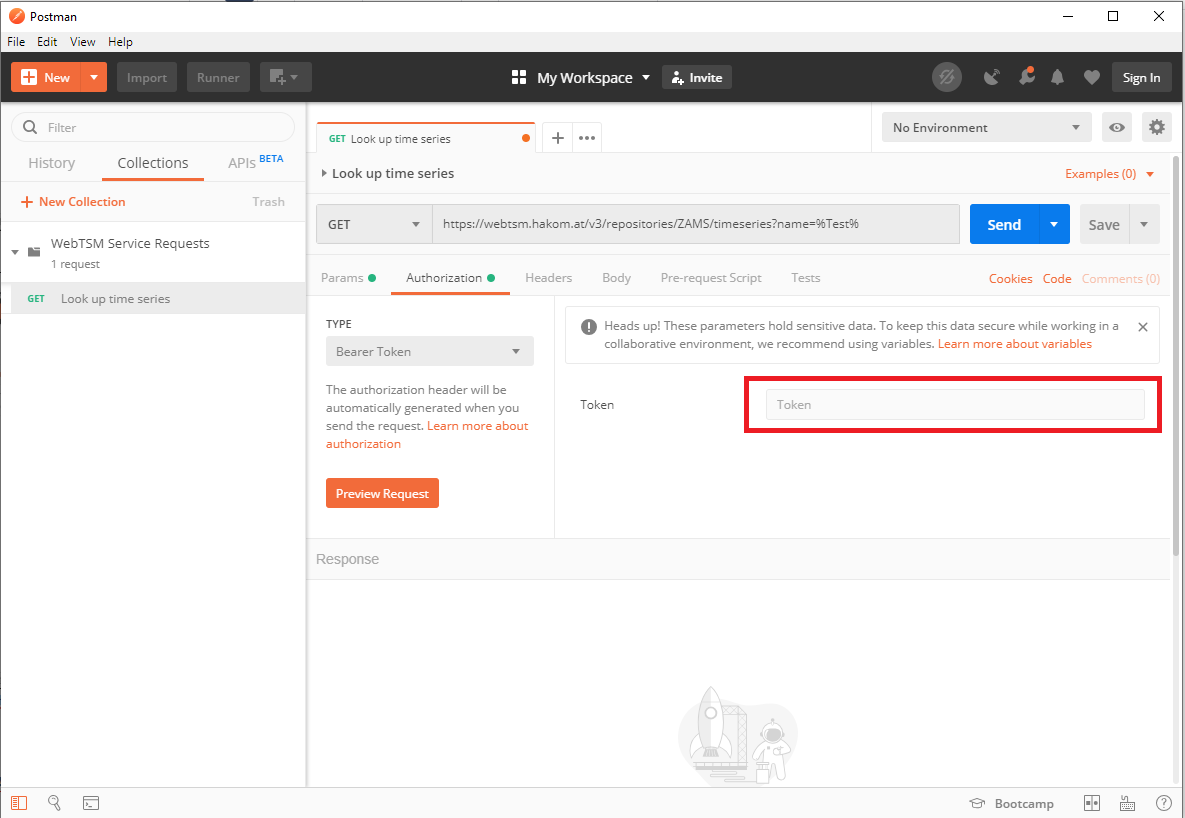
- Click on "Send" to make the request.
Obtaining And Using A Token From The Integrated Identity Provider Using Postman
- Create a new request:
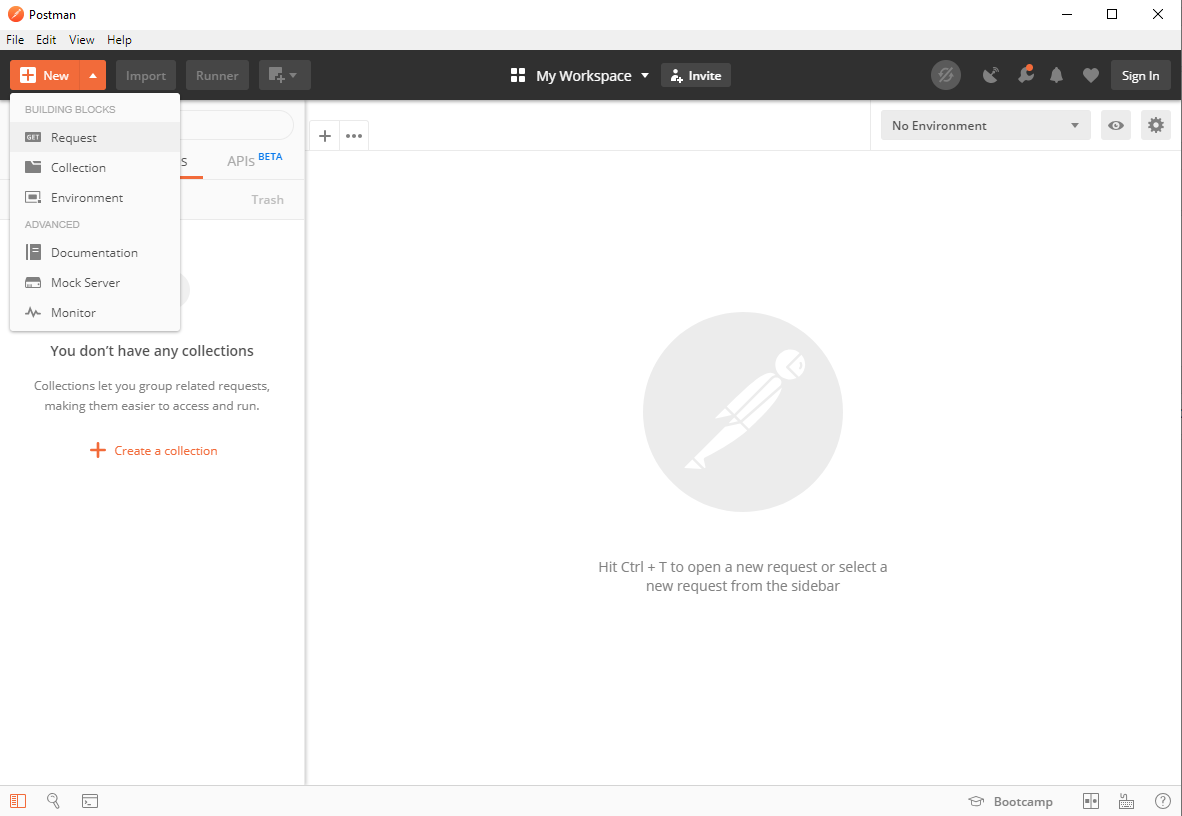
- Enter the URL for the request you would like to make
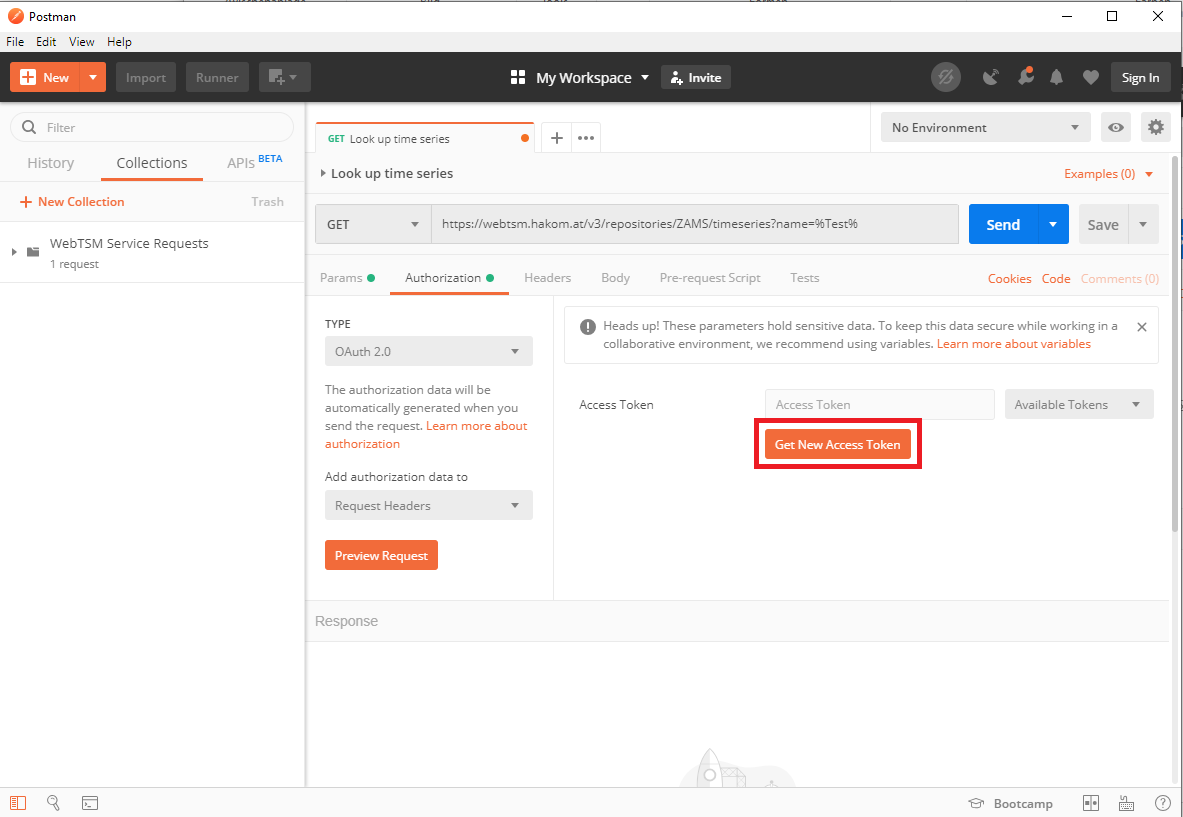
- Switch to the "Authorization" tab and select "OAuth 2.0"
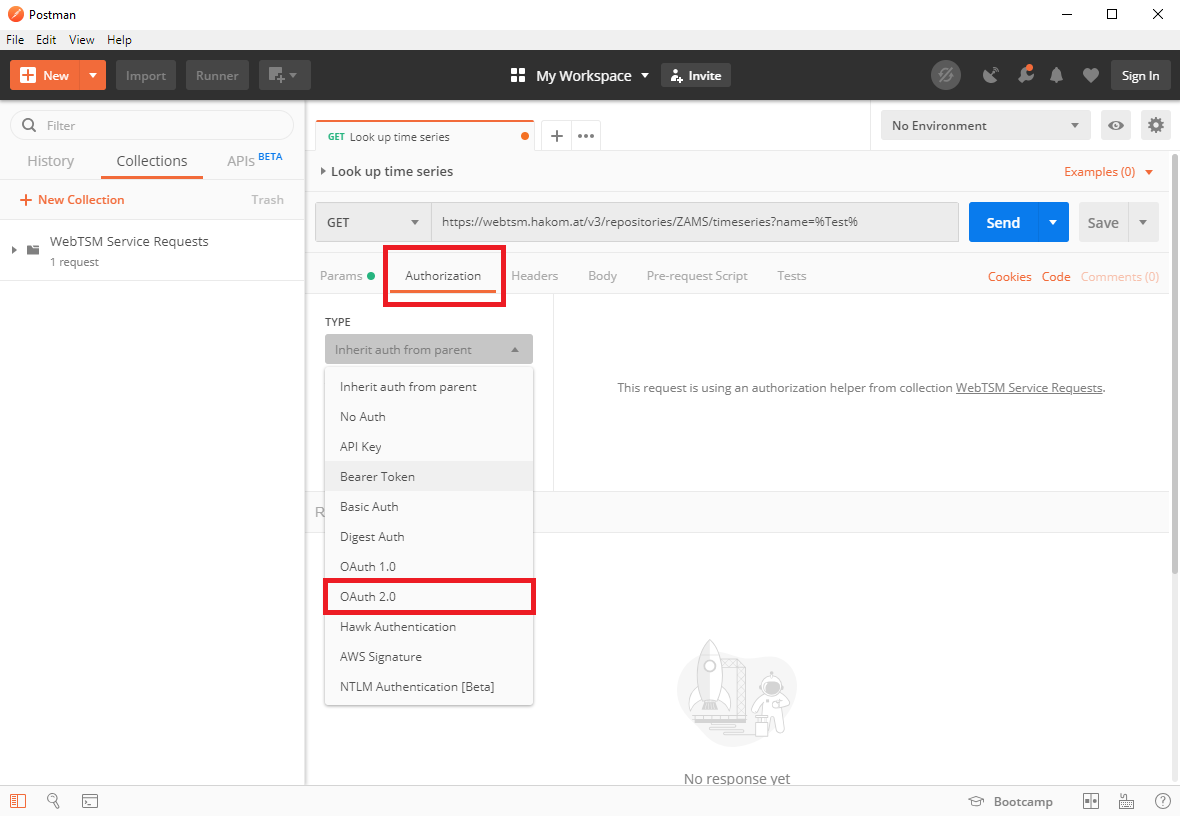
- Click on "Get New Access Token"
- Select one of the three following Grant Types:
- Password Credentials
Use this when you have a user name and password. If you have previously used Basic authentication, this will most likely be the type of authentication you will want to use. - Client Credentials
Use this when you have a client id and client secret. This will most likely be what you'll be using if you are developing a trusted client application
- Password Credentials
- Continue with the instructions for the Grant Type you selected
Note that "Implicit" flow authentication is currently not supported directly from within Postman due to limitations in the application (limited support for nonce parameters, no support for Basic authentication challenges on authorization endpoint).
Obtaining a Token Using Password Credentials
- Enter all the information as highlighted in the following screenshot:
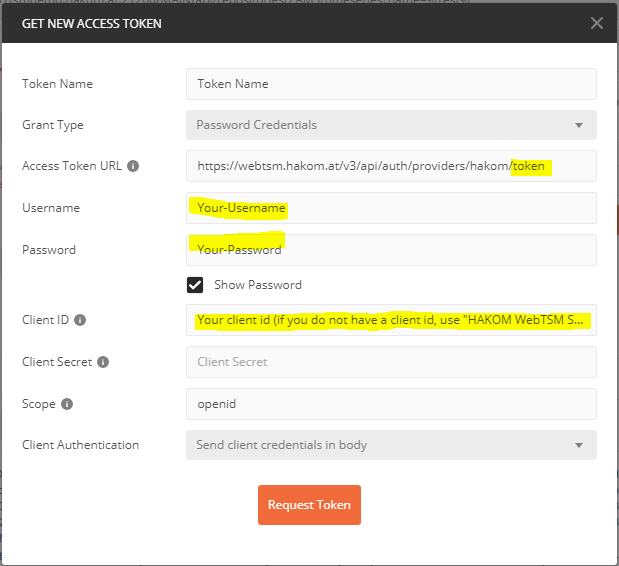
Note that as Client ID, you may specify "HAKOM WebTSM Services" if you did not receive a dedicated client id - Click on "Request Token".
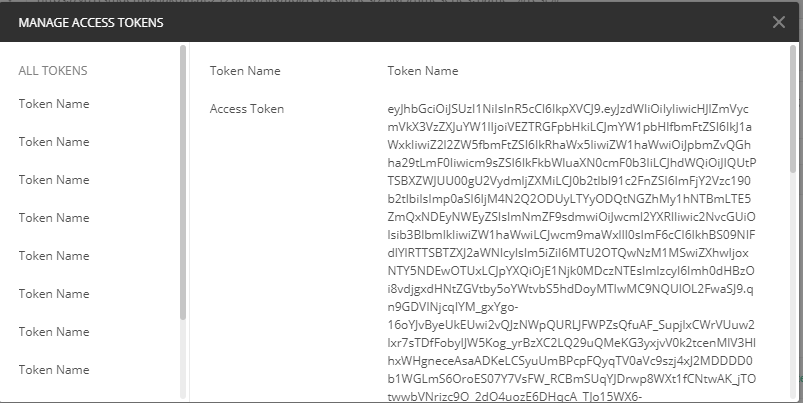
- Scroll all the way down and click on "Use Token"
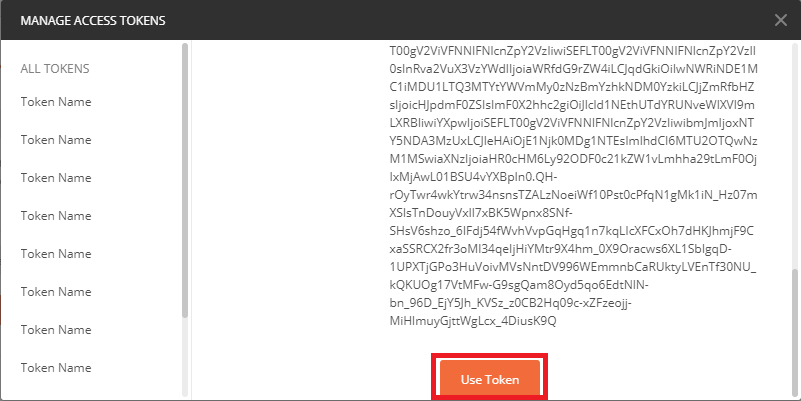
- The token will now be used in all subsequent requests.
Obtaining a Token Using Client Credentials
- Except for the first step, this is identical to using password credentials. Simply enter your client credentials in the corresponding fields
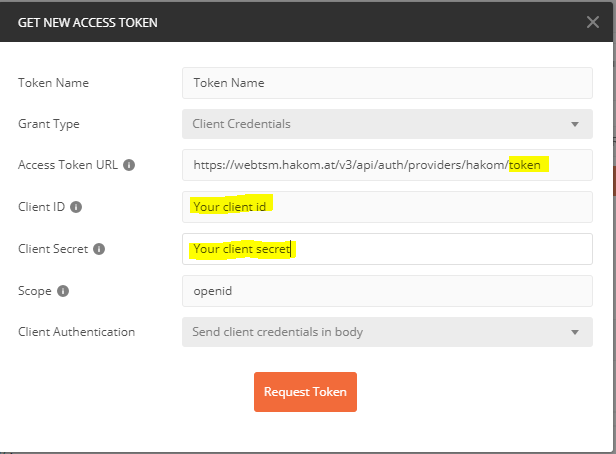
Note that unlike when using password credentials, you may not use "HAKOM WebTSM Service" as a generic client id with this type of authentication. All clients using a client secret must be explicitly configured in the service by its operator. - Then continue with steps 3. and 4. from above.