
Time series master data can be read to or from Excel by pressing the buttons “Export” respectively “Import”. This eases editing of time series master data as well as creating time series.
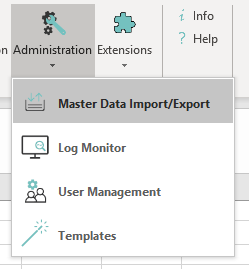
You can open the Plug-in via the button from the "Administration" ribbon:
It is possible to select "PowerTSM Database" and/or "WebTSM Services" as the data source, depending on the configuration.

Time Series Master Data Export
Clicking the "Export" button will open the Time Series Search window where you can search the time series that are to be exported. For reading time series master data to Excel, select the desired time series in the spread sheet and press “OK” in the “Add selection to application” field.
Http connections can also be specified as the data source in order to be able to export time series from these.
Time Series Master Data Import
Time series master data can be imported from currently active Excel sheets. Therefore it is required that the format in the Excel sheet to be imported corresponds to the format used for the export.

Time Series Master Data – Table Fields
The fields from this table are mandatory for a master data import. When it comes to attributes additional fields have to be used. These are shown and explained in the template, which can be opened by clicking on "Import template with data examples".
|
Field |
Mandatory |
Description |
Possible Values |
Example |
|---|---|---|---|---|
|
ObjectID |
Only if the definition of a existing time series is edited |
Unique ID of the specific time series master data set. |
|
|
|
Name |
yes |
Unique name of a time series |
|
|
|
Description |
|
Description of the time series |
|
|
|
Unit |
yes |
The unit of the time series |
|
|
|
Type |
yes |
The type of the time data |
|
|
|
Interval |
yes |
Time resolution |
|
|
|
Interval length |
yes |
Length of an interval |
|
|
|
Formula |
|
Formula to calculate a time series' data |
|
You can find examples of formulas under Formula Time Series |
|
Table |
|
The data table for the time series |
|
|
|
Archive table |
|
The archive data table for the time series |
|
|
|
TimeZone |
|
Name of the time zone. Besides the time zones supported by Microsoft, there are several time zones defined by HAKOM. |
For a list of time zones supported by Microsoft, see https://support.microsoft.com/en-us/help/973627/microsoft-time-zone-index-values. A list of HAKOM specific time zones can be found under (3.11.2.2) Reading Data into Excel |
W. Europe Standard Time |
|
StartOfYear |
|
Value by which the interval is shifted (in months). |
1-12 |
|
|
StartOfDay |
|
Value by which the interval is shifted (in hours from midnight on). |
0-23 |
|
|
PreserveDuplicatedValues |
|
Defines whether identical consecutive values are stored (TRUE) or not (FALSE) in spontaneous time series when saving. |
|
|
|
Aggregation |
|
Determines which method is used to aggregate time series data. |
|
|
|
QuotationDefaultBehavior |
|
Defines the standard behavior when reading quotation time series if no quotation date has been set. If a value is entered here, it overrules the one set in the HAKOM.Config. |
|
|
When time series master data is imported, the TSM differentiates between entries which have already existed in the data base and have just been edited (after an export) or if new entries shall be created in the data base.
Import of New Time Series Master Data
When importing new data, the ObjectID has to stay empty and the Name must not be in use in the database already.

In order to import time series into an http connection data source, the import template only differs in the data source area. In the case of an http connection, the ID of the data source and the repository must be specified in field B2. It is also important to successfully log in to the WebTSM service before importing. This can be done via the "Master Data Import/Export" plug-in ("Sign in" button with correctly selected data source).
Example:
In the HAKOM.Config there is an HttpConnection with the Id "WebTSMService". The WebTSM service configured here has a repository "TSM". To import time series here, the import file must contain "WebTSMService/TSM" in field B2 (next to "Data source").
Re-Import of Time Series Master Data After Editing
After a “Time Series Master Data Export” like described above, the time series categories which have been read to Excel can be edited.

Changes can be read from Excel and saved to the data base by clicking the button “Import”.
If data is re-imported from Excel (existing data in the data base is updated) the ObjectID has to stay the same and shall not be edited (For more information see: Time series Master Data).
Attribute Assignment Settings
Additional settings can be made for the import of time series master data:
-
Add categories
If this checkbox is active, attributes of type "category" will be saved to the database, if they have not already existed.Note: This will work for attributes of type "category" only! All other types attributes that are to be assigned via master data import must already be saved on the database!
-
Ignore blank attribute entries
This option is selected by default. It means, that time series, that do not have an entry in the column of an attribute will not this attribute assigned to them.
In the example above, “An_attribute” would be assigned to "Doc_TS_1", while the attribute would not be assigned to "Doc_TS_2". “A_category” would be assigned to both. -
Import also blank attribute entries
If this option is selected, attributes will also be assigned to time series, when the relevant column is empty.
In the example above, “An_attribute” would be assigned to both time series, but only "Doc_TS_1" would have a value for it. -
Delete blank attribute entries
If this option is selected, attributes will be unassigned from the time series, if the relevant column is empty.
In the example above this would mean, that "Doc_TS_2" would loose "An_attribute".
Time Slots on Attributes
It is possible to create time slots on attributes. To achieve this, follow the instructions below:
The time series, on which you want to create an attribute time slot, is exported as usual.
Each attribute assigned to this time series is displayed in a separate column. Depending on whether you want to create time slot on an attribute or category you have to use one of the two following patterns, since categories can either be true or false, but attributes can have varying values:
Therefore, if it is an attribute, changes are to be made in the column of the attribute according to the following scheme:
<AttributeSlots>
	<Slot>
		<ValidFrom>1972-01-01T00:00:00+01:00</ValidFrom>
		<Value>Value 1</Value>
	</Slot>
	<Slot>
		<ValidFrom>2017-08-08T00:00:00+02:00</ValidFrom>
		<Value>Value 2</Value>
	</Slot>
</AttributeSlots>

The value within the value-tags is valid until the next time slot.
Categories
Changes to a category must be made according to the following schema:
<AttributeSlots>
	<Slot>
		<ValidFrom>1972-01-01T00:00:00+01:00</ValidFrom>
		<Value>true</Value>
	</Slot>
	<Slot>
		<ValidFrom>2017-08-08T00:00:00+02:00</ValidFrom>
		<Value>false</Value>
	</Slot>
</AttributeSlots>
true: The category applies until the next time slot value is "false".
false: The category does not apply until the next slot value is "true".
List Attributes
Support for import and export of list attribute assignments has been added in versions 3.10.6.6 and 3.11.2.2+.
When exporting list attributes assigned to a time series, the values are suffixed with the name of the used list attribute unit in brackets:
-
For single values selected in the assignment:
List Attribute Value 1 [My List Attribute Unit] -
For time slots:
XML<AttributeSlots> <Slot> <ValidFrom>1972-01-01T00:00:00+01:00</ValidFrom> <Value>List Attribute Value 1</Value> </Slot> <Slot> <ValidFrom>2017-08-08T00:00:00+02:00</ValidFrom> <Value>List Attribute Value 2</Value> </Slot> </AttributeSlots> [My List Attribute Unit]
List attribute assignments can only be successfully imported if the list attribute unit is specified in brackets (as shown above) or if the target attribute has only one list attribute unit or the target attribute has a default unit defined!
Export and Import of Attributes
Similar to the time series import and export, attributes can be imported to and exported from all data sources using a template via the "Master Data Import/Export" plug-in.
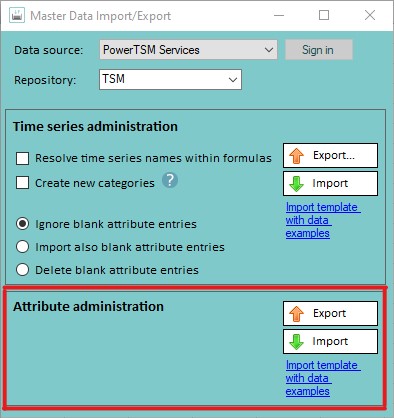
Export
The "Export" button exports all attributes from the data source and repository selected above to an spreadsheet.
Import
The "Import" button imports all attributes from the currently active sheet into the data source specified in the sheet.
An example of the import template can be generated via "Import template with data examples".
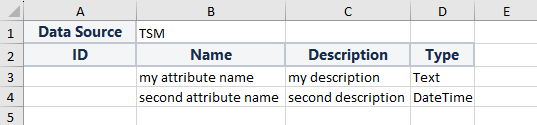
Data Source:
The data source into which the attributes are to be imported.
For database connections, only the repository needs to be specified here.
For http connections, the HttpConnection Id and the repository must be specified here in the following format: HttpConnectionId/Repository.
ID:
Optional field. If an attribute is to be renamed, the reference to the attribute to be renamed can be specified via the ID. This field must remain empty for new attributes.
Name:
This field can either be used to specify the name of the new attribute or, if an attribute with this name already exists, it will be updated.
Description:
A description can be assigned to the attribute via "Description".
Type:
The type of attribute is defined here. The following types are supported:
-
Boolean
-
Category
-
DateTime
-
List
-
MSCONSID
-
Node
-
Numeric
-
Text
-
MultilineText
-
TimeSeries
-
TimeSpan