
Token Authentication
Introduction
Token authentication requires configuring one or more identity providers whose tokens are accepted by the WebTSM Services instance.
In order to ease the migration to token authentication, WebTSM Services come with their own (integrated) identity provider so you do not have to configure any external applications and still reap the benefits of using tokens.
Chosing Whether to Use the Integrated Identity Provider or an External Identity Provider
The integrated identity provider makes transitioning from previous versions easier.
- Users are managed just the same way as they were managed previously.
- Client applications can now use the same credentials that they previously used for Basic authentication to request a token
- Useful if you do not want to install or configure another identity provider
Configuring an external identity provider could be beneficial if
- You are already managing users and roles using another system (such as Keycloak, Active Directory, etc) and would like to use these users and roles with the WebTSM Services.
Configuring the Integrated Identity Provider
Configuration of the integrated identity provider is done inside the HAKOM.Config file under //HAKOMConfiguration/products/WebTSMServices/Authentication/IntegratedIdentityProvider
<HAKOMConfiguration>
	<products>
		<WebTSMServices>
			<Authentication>
				<IntegratedIdentityProvider>
					<!-- INSERT SETTINGS HERE -->
				</IntegratedIdentityProvider>
			</Authentication>
		</WebTSMServices>
	</products>
</HAKOMConfiguration>
A sample configuration would could look like this (settings which are not related to the integrated identity provider are omitted for brevity)
<HAKOMConfiguration>
	<products>
		<WebTSMServices>
			<Authentication>
				<IntegratedIdentityProvider>
					<Enabled>true</Enabled>
					<Endpoint>https://api.example.com</Endpoint>
					<CertificateThumbprint>c705431d9aefbcd00c9b19812001c34423dc70ac</CertificateThumbprint>
					<ValidClients>
						<Client>
							<Id>dev client</Id>
							<RedirectUris>
								<Uri>http://www.example.com/signin-oidc</Uri>
							</RedirectUris>
						</Client>
					</ValidClients>
				</IntegratedIdentityProvider>
			</Authentication>
		</WebTSMServices>
	</products>
</HAKOMConfiguration>
Basic Configuration
Enabled
Setting this to false disables the integrated identity provider as well as Basic authentication.
Endpoint
The value used here is used as the Issuer URI in tokens created by the identity provider. This value is important because it allows other services to automatically retrieve public keys for validating the token.
This URI must be accessible by all clients using the identity provider. A quick test to make sure wether it's a correct value:
- Start the service
- Enter the configured URI into a web browser
You should now receive a response from the service with the version information, looking something like this:
CODE{"Name":"HAKOM WebTSM Services","Description":"Time Series Management Webservices","Version":"3.8.4.0+65444"}- Note that wildcards such as * or + are not allowed in the Endpoint configuration
Endpoint Configuration and Reverse Proxies
In simple cases, the "Endpoint" value may be the same as the one specified under /HAKOMConfiguration/products/WebTSMServices/Hosting/Url.
Sometimes this will not be the case.
Lets assume the following scenario:
- You have a server accessible by the host name api.example.com
- On that server, you have the WebTSM Services installed, listening (based on the Url configuration) on "http://127.0.0.1:8524"
- You also have a reverse proxy set up to accept incoming SSL requests on port 443
- All requests to https://api.example.com/v3 are then forwarded (without SSL) to the WebTSM Service running on the same machine on port 8524
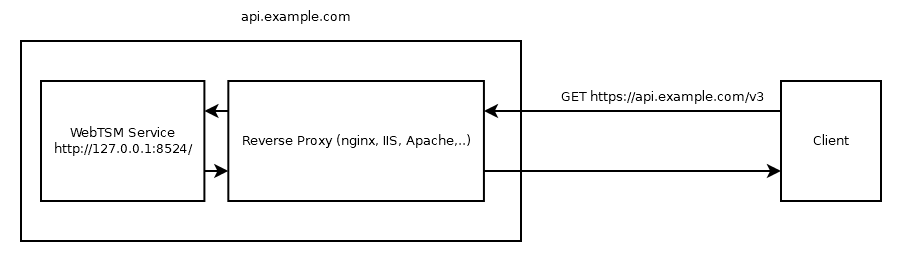
This type of offloading SSL to a reverse proxy is very common. Other common reasons for such a setup may include
- Hosting of multiple versions of the service under default ports
- Load balancing
- Fault tolerance via automatic fail-over, etc.
In this case, the value under <Endpoint> would be "https://api.example.com/v3" and not http://127.0.0.1:8524
Security Configuration
When tokens are created, they are signed using a private key. The signature is then verified by anyone using the token to ensure its validity. These keys must therefore be configured.
The following lists all the ways in which the keys can be configured in order of increased level of security.
| Type of Configuration | Level of Protection | Notes |
|---|---|---|
| None | Very Low | Anyone with access to a HAKOM.Framework.Services.dll can theoretically extract the private key and use it to forge a token. |
| Public/Private Keys | Low | The HAKOM.Config file must be secured against access by any third party. This may be difficult when its shared across multiple HAKOM products (i.e. located on a network share) |
| Certificate Path and Password | Good | Attacker would need access to both, the HAKOM.Config as well as the location of the certificate file. |
| Certificate Thumbprint | Very Good | Attacker needs access to the local machines key store. This requires login credentials on the server. If these are available to the attacker, forged tokens are probably the least of your worries. |
The recommended option is to store the certificate in the local machine store and access it using its thumbprint. This ensures the safety of the private key even if the HAKOM.Config file is compromised.
More detailed, step-by-step guides for each of these methods can be found further down in this document.
Using the Default Keys
In order to ease getting the service up and running, the service comes with its own public and private key which are used to sign tokens if nothing else is specified.
Note, however that these keys are the same with every copy of the WebTSM Service binaries so the private key should be considered compromised. Basically, assume that as long as you're using the default keys, anyone could be signing tokens on the services behalf.
Therefore especially in production environments, one of the methods listed below should be used.
Specifying Private/Public Keys Explicitly
You may generate an RSA key pair manually and insert its parameters into the HAKOM.Config file as shown in the following example
Example
<HAKOMConfiguration>
	<products>
		<WebTSMServices>
			<Authentication>
				<IntegratedIdentityProvider>
					<Rsa>
						<PublicKey>
							<Modulus>3qkLL...dQKxpK87G2xdoqRv7Uw==</Modulus>
							<Exponent>AQAB</Exponent>
						</PublicKey>
						<PrivateKey>
							<RSAKeyValue>
								<Modulus>3qkLL.....dQKxpK87G2xdoqRv7Uw==</Modulus>
								<Exponent>AQAB</Exponent>
								<P>8tf..Lc=</P>
								<Q>6uT9..kkU=</Q>
								<DP>3F1..guzKdc=</DP>
								<DQ>FwI..mZ085E=</DQ>
								<InverseQ>biU7v..MsBE5nCzE=</InverseQ>
								<D>asAhUH2vTgnuVRZ..A3sfA9LfgJ59jzNzPz0+Q==</D>
							</RSAKeyValue>
						</PrivateKey>
					</Rsa>
				</IntegratedIdentityProvider>
			</Authentication>
		</WebTSMServices>
	</products>
</HAKOMConfiguration>
This will then override the default key pair.
Specifying a Certificate File and its Password
Alternatively, you may specify a certificate file that contains public and private key (PFX format) together with its password
Example
<HAKOMConfiguration>
	<products>
		<WebTSMServices>
			<Authentication>
				<IntegratedIdentityProvider>
					<CertificatePath>C:\certificates\service.pfx</CertificatePath>
					<CertificatePassword>Topsecret!</CertificatePath>
				</IntegratedIdentityProvider>
			</Authentication>
		</WebTSMServices>
	</products>
</HAKOMConfiguration>
This will override any RSA pair specified in the HAKOM.Config as well as the default keys.
Specifying the Thumbprint of a Locally Installed Certificate
This is the recommended way of specifying signing keys.
First, make sure the RSA certificate is installed in either the local machine store or the user store (must be the same user under which the service is run).
Use certmgr.mcs or lmcert.msc to inspect the installed certificate and copy its thumbprint. Insert this thumbprint (without spaces) into the HAKOM.Config as follows:
Example
<HAKOMConfiguration>
	<products>
		<WebTSMServices>
			<Authentication>
				<IntegratedIdentityProvider>
					<CertificateThumbprint>4aef55...baa22</CertificateThumbprint>
				</IntegratedIdentityProvider>
			</Authentication>
		</WebTSMServices>
	</products>
</HAKOMConfiguration>
This will override any other method of specifying keys, including the default keys.
Client Configuration
Any client application wishing to use the service as an identity provider must be configured. The only exception is the service itself which is already considered a known client with the id "HAKOM WebTSM Service".
Clients are configured under //HAKOMConfiguration/products/WebTSMServices/Authentication/IntegratedIdentityProvider/ValidClients
Example
<HAKOMConfiguration>
	<products>
		<WebTSMServices>
			<Authentication>
				<IntegratedIdentityProvider>
					<ValidClients>
						<Client>
							<Id>dev client</Id>
							<RedirectUris>
								<Uri>http://www.example.com/signin-oidc</Uri>
							</RedirectUris>
						</Client>
					</ValidClients>
				</IntegratedIdentityProvider>
			</Authentication>
		</WebTSMServices>
	</products>
</HAKOMConfiguration>
Each <Client> entry is configured using a combination of the following parameters
Id (required)
Specifies the identifier of the client application. This must be used in token and authorization requests as the client_id parameter.
Secret (optional)
If you want to enable token requests with grant type client_credentials, set the client secret here. This way, when the client requests a token, instead of supplying username and password, the client would only supply client_id and client_secret.
User (optional)
This is only required when specifying a secret, thus allowing token requests of grant type "client_credentials"
This setting causes an authenticated client to "impersonate" the specified user.
RedirectUris (optional)
This is a list of valid URIs which can be used by untrusted clients during sign-in. This is done by redirecting the user to
/auth/providers/hakom/authorizationAfter the user has been authenticated, the client is redirected to the URI given in the request with the token included in the fragment of the URI.
Notes Regarding Client Configuration and Client Types
As previously noted, clients may be "trusted" (able to keep credentials secure) or "untrusted" (require human action for authentication).
The grant type "client_credentials" should only be used with the former, since they will need to have the credentials stored in their code, whereas the latter should always use grant type password and use an interactive login to request a token.
Configuring External Identity Providers
External identity providers must support the OpenID Connect standard. Simple OAuth 2.0 providers will not work.
Summary
In order for the WebTSM Services to accept tokens from another identity provider, several steps have to be taken on both ends. Because these steps vary somewhat depending on the type of identity provider used, only an overview with general information regarding the available settings is given here. There is a detailed example using Azure Active Directory at the bottom of this document. Examples can also provided upon request for other identity providers (Active Directory Federation Services, Keycloak, Auth0)
Required Steps
- The WebTSM Services have to be configured to know about the identity provider.
- The identity provider has to be configured to know about the WebTSM Services.
- The identity provider has to be configured to include user roles in the generated token.
Optional Steps
These steps depend on the type of identity provider as well as the methods of authentication you want to allow
- The WebTSM Services have to be configured to interpret the roles received for a user of the identity provider.
- The WebTSM Services have to be configured to include the correct scopes in authorization and token requests.
- The WebTSM Services have to be configured to allow cookies to persist across domains.
Details
Configuring an external identity providers needs a new entry in the HAKOM.Config file under the section responsible for configuring the WebTSM Services Authentication:
Example Configuration of External Identity Provider
<HAKOMConfiguration>
	<products>
		<WebTSMServices>
			<Authentication>
				<IdentityProviders>
					<IdentityProvider>
						<Name>Identity_Provider</Name>
						<Authority>https://auth.example.com</Authority>
						<ClientId>Id-given-by-the-identity-provider</ClientId>
						<ClientSecret>Secret-given-by-the-identity-provider</ClientSecret>
						<Configuration>https://auth.example.com/.well-known/openid-configuration</Configuration>
						<Help>https://docs.example.com/auth/getting-a-token</Help>
						<Scopes>
							<Scope>openid</Scope>
							<Scope>email</Scope>
						</Scopes>
						<ClaimMappings>
							<ClaimMapping From="customroles" To="roles">
							<ClaimValueMappings>
								<ClaimValueMapping From="customadmin" To="Administrator"/>
							</ClaimValueMappings>
							</ClaimMapping>
							<ClaimMapping From="username" To="preferred_username">
							</ClaimMapping>
						</ClaimMappings>
					</IdentityProvider>
				</IdentityProviders>
			</Authentication>
		</WebTSMServices>
	</products>
</HAKOMConfiguration>
Required Settings
| Setting | Description |
|---|---|
| Name | This name will be exposed to users when querying which identity providers are available. Spaces and special characters are technically allowed, but a url-sanitized version of this will also be used in URLs used for signing in, so to improve url readability, avoid spaces and special characters. |
| Authority | The URL at which the identity provider can be reached. This will depend on the type of identity provider and its configuration. |
| ClientId | The unique identifier given to the WebTSM Services by the identity provider when registering the WebTSM Services with the provider. Some providers let you specify this, others assign a GUID, etc. |
| ClientSecret | The secret given by the identity provider when registering the WebTSM Services. Again, sometimes this is assigned by the provider, sometimes you may set this yourself. |
Optional Settings
| Setting | Description | Default |
|---|---|---|
| Configuration | The URL of the OpenID Connect Discovery document. Depends on the identity provider | {Authority}/.well-known/openid-configuration |
| Help | A link to help the developers accessing this service instance find out how to generate tokens. (Since this can vary quite a bit depending on provider, this could be quite helpful) | N/A |
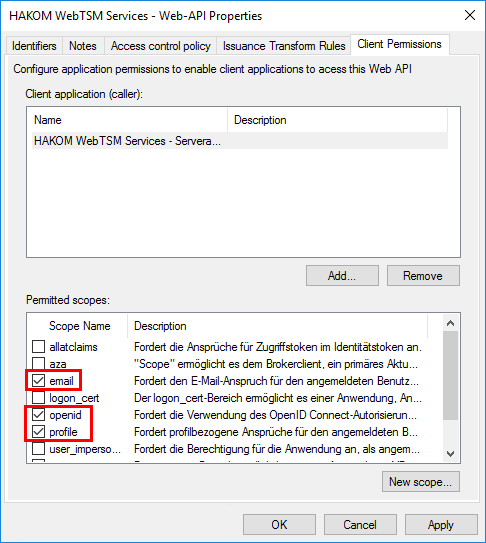
| Scopes/Scope | A list of scopes that should be requested from the identity provider. By default, the scopes "openid", "profile" and "email" are requested. Some providers require a different set of scopes. | "openid", "profile", "email" |
| ClaimMappings/ClaimMapping | This allows to map claims from the access token received by the identity provider to be remapped to claims that the WebTSM Services understand. For example, the WebTSM Services expect a list of roles in the "roles" claim within the token. If however your identity provider puts custom role inside a "customroles" claim, you could add a mapping here:
CODE
| N/A |
| ClaimValueMappings/ClaimValueMapping | Allows you to map specific values of a claim to something the WebTSM Services understand. If you want to map only the values but not the claim name, simply set the "From" and "To" attributes to the same value on the parent "ClaimMapping" element. | N/A |
Examples
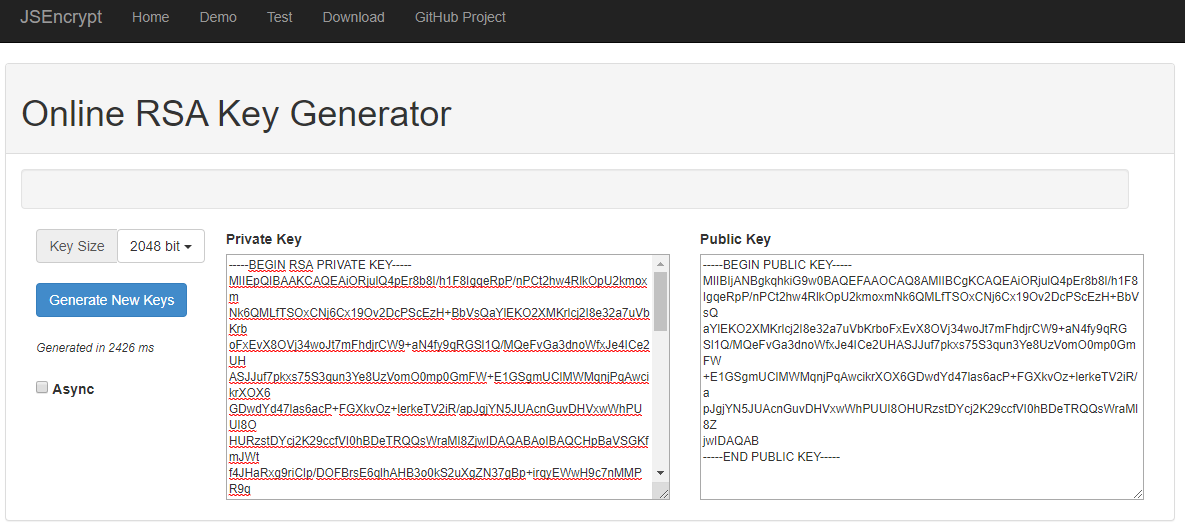
Generating Keys for the Integrated Identity Provider
Configuring a Public And Private Key in HAKOM.Config
There are a number of ways you can generate an RSA key pair. Aside from command line tools and libraries for various programming languages, several online tools exist for that purpose. This example will use the Online RSA Key Generator found here: https://travistidwell.com/jsencrypt/demo/
After generating a private and public key, it has to be transformed into the correct format. For this too, an online tool can be used: https://superdry.apphb.com/tools/online-rsa-key-converter
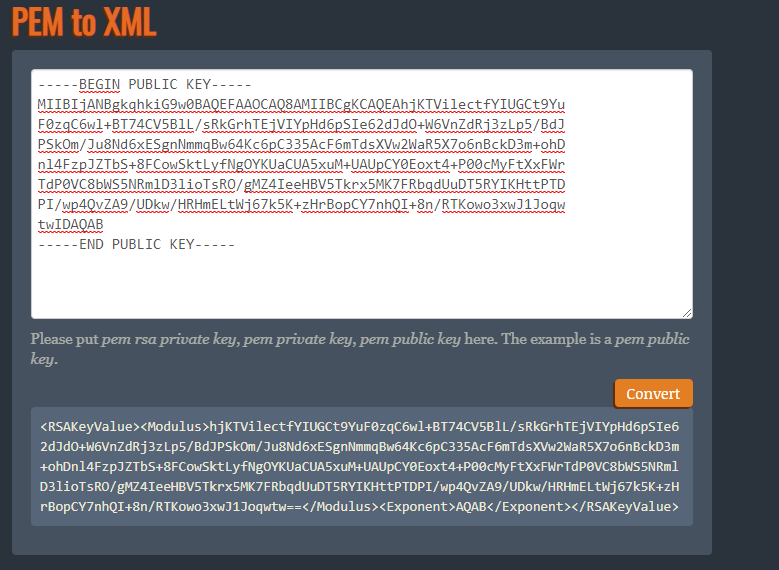
Copy the XML (the content of the RSAKeyValue tag) for private and public keys into the HAKOM.Config file:
<HAKOMConfiguration>
	<products>
		<WebTSMServices>
			<Authentication>
				<IntegratedIdentityProvider>
					<Rsa>
						<PublicKey>
							<Modulus>
iORjulQ4pEr8b8I/h1F8IgqeRpP/nPCt2hw4RlkOpU2kmoxmNk6QMLfTSOxCNj6Cx19Ov2DcPScEzH+BbVsQaYlEKO2XMKrlcj2I8e32a7uVbKrboFxEvX8OVj34woJt7mFhdjrCW9+aN4fy9qRGSl1Q/MQeFvGa3dnoWfxJe4ICe2UHASJJuf7pkxs75S3qun3Ye8UzVomO0mp0GmFW+E1GSgmUCIMWMqnjPqAwcikrXOX6GDwdYd47las6acP+FGXkvOz+lerkeTV2iR/apJgjYN5JUAcnGuvDHVxwWhPUUI8OHURzstDYcj2K29ccfVI0hBDeTRQQsWraMI8Zjw==
							</Modulus>
							<Exponent>AQAB</Exponent>
						</PublicKey>
					<PrivateKey>
						<Modulus>
iORjulQ4pEr8b8I/h1F8IgqeRpP/nPCt2hw4RlkOpU2kmoxmNk6QMLfTSOxCNj6Cx19Ov2DcPScEzH+BbVsQaYlEKO2XMKrlcj2I8e32a7uVbKrboFxEvX8OVj34woJt7mFhdjrCW9+aN4fy9qRGSl1Q/MQeFvGa3dnoWfxJe4ICe2UHASJJuf7pkxs75S3qun3Ye8UzVomO0mp0GmFW+E1GSgmUCIMWMqnjPqAwcikrXOX6GDwdYd47las6acP+FGXkvOz+lerkeTV2iR/apJgjYN5JUAcnGuvDHVxwWhPUUI8OHURzstDYcj2K29ccfVI0hBDeTRQQsWraMI8Zjw==
						</Modulus>
						<Exponent>AQAB</Exponent>
						<P>0wJksq7VCddEQUYfqmszUfHLp0yOwKTzDNQS8WvFQh2lf8DQZrvbmP5dNf6paEN2eL2PmOADV4dh82LyqK9WyA6yWuuEawGf4pygsOlPP/SM3hU6aKA9jj3uG3BNcm05kmcPNRcpkoDFRpFct8I8WDq/cfzgMMvPMcl/CpjnvWU=</P>
						<Q>phRtfHMVuqYs+NVxvF4yHaEZIcZ54uaXwk+UyYMsgucQ8BK99zkx7C1mzjhuI9lQncU+Ay7iUkYjKXm+Fj4ztAYwKJMRRupJJzAB1mSkmsXp5iTKJW11qtuOHThOm72H7XpXEkgFuid2KITOrdEggYv1gOQ1ze6TiZCjqRjHdeM=</Q>
						<DP>nhpv+xZWl+4MvV/egCGcrWyf7HXHjH7LgjQxEWVvwu9VvxhozmE51DPbAYcTxgSucx+Nxb0ro9zTvrrIGS5vtqyUZN2NNWRdOT2khYn7EG+bURfU0Oon1Tl//F00GmXOumywD1aQlq4Xop1uPF20O2OhaLZSAR3k3Gge4YDaOqU=</DP>
						<DQ>OxiZvObWnIv1BLYuunBqNNDWOIZ/aJXU+neG4g2jERFXnZWNsyLO+NNO+aJqzqbNYNaGsmtEbTI34NJJKXEIxM5O5KEwTKOhVCho/vjg+ZHjINmGdLr2W820TAF1N0XB0GbwBLlMEGlqShC32nHHt1EuEqch3h0+snydP9ZpYzE=</DQ>
						<InverseQ>mw6SPb16OocZcOjf7aayGPI1M13eGn0KN+9chXGnASuQ/eDDszf13xzWthZav9w7AK1pGKpcp3xDK+DVtoDGQo49Vbtl4K82rP10mFu0GLcg7toPfjO+vxl2EPgZ06jHW+hWc5hRkbgXy4/TYOlZfI10hshr1+h9oSz/MXXTTyY=</InverseQ>
						<D>
h6QWlUhin5iVrX+CR2kcYPa4giKfwzhQa7BOqpYQBwd6NJEtrl4GTd+4Aafoq6shFsB/XO5zDD0faiplaqAzEP+shAl4KAcONzZ1/ZLW+0Tx+K0L1kfW7RV6dUYOuV1X5D6lverXLwXO33tb6bw40fLJDsydLArWc0E6FAACJ9fjS76dHFb9NFUIKqBug4sRTNlDBXrh2Di4YkgcBsgUjJNHijroCDwUKguYBPUGMHxxQPGoLAR3neT4pj28IgkxoKbjskv6cPJJZXpqhe1BNRNAH1TbUgur58xIGwuNvmoLs+FpnGuFNd16enqYasqKVDxaD04aPlZsw4GAc3MT0Q==
						</D>
					</PrivateKey>
					<Rsa>
				</IntegratedIdentityProvider>
			</Authentication>
		</WebTSMServices>
	</products>
</HAKOMConfiguration>
Using a Certificate and Password in HAKOM.Config
For this method we'll use the openssl command line tool to generate a certificate. The tool is available here: https://wiki.openssl.org/index.php/Binaries
First, generate the keys in PEM format.
C:\Users\--\Desktop>C:\Program Files\OpenSSL-Win64\bin\openssl.exe req -x509 -days 365 -newkey rsa:2048 -sha256 -keyout key.pem -out cert.pem
This will ask you for a password (as well as some optional information to be included in the keys) and generate an encrypted private key (key.pem) as well as a certificate (cert.pem)
In order to use the certificate, you must combine those two files into a single PFX file.
This is done using the OpenSSL command line tool as well:
C:\Users\--\Desktop>"C:\Program Files\OpenSSL-Win64\bin\openssl.exe" pkcs12 -export -in cert.pem -inkey key.pem -out private.pfxThis will ask you for the password you have entered in the step above and ask you for another one to encrypt the pfx file with.
It will then generate the encrypted certificate in pfx format
Assuming you have entered "test2" as a passwort in this last step, the following configuration in the HAKOM.Config would cause the WebTSM Services to sign all tokens using the certificate:
<HAKOMConfiguration>
	<products>
		<WebTSMServices>
			<Authentication>
				<IntegratedIdentityProvider>
					<CertificatePath>
						C:\Users\--\Desktop\private.pfx
					</CertificatePath>
					<CertificatePassword>test2</CertificatePassword>
				</IntegratedIdentityProvider>
			</Authentication>
		</WebTSMServices>
	</products>
</HAKOMConfiguration>
Using a Certificate From the Machine Store
This method does not require any type of credentials (private key, password, etc.) to be put into the HAKOM.Config file and should therefore be the preferred method of defining the signing credentials used by the integrated identity provider.
Start by generating a .pfx file (this is done exactly the same way as in the previous method).
Now, instead of entering the .pfx file and password into the HAKOM.Config, simply navigate to the pfx file in the windows explorer and double click on it.
This will open up the Certificate Import Assistant
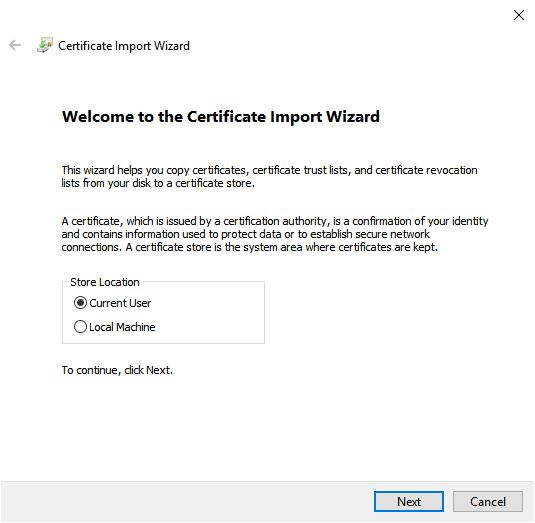
Select "local machine" as the target store and click on "Next"
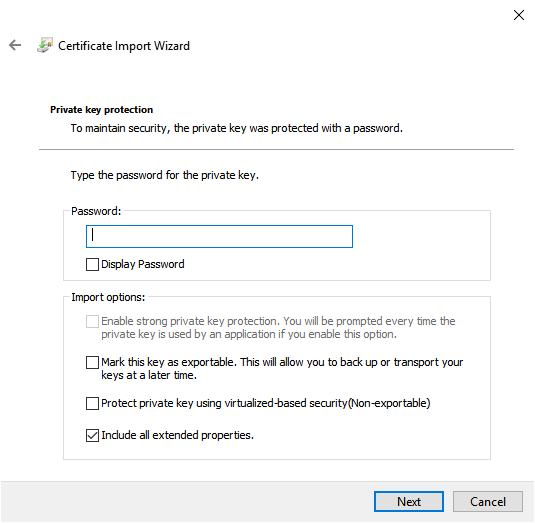
Enter the password you have used to generate the .pfx file (in the previous example, we've used "test2"
Let the assistant automatically determine the location of the certificate and keep clicking "Next" until the assistant has finished.
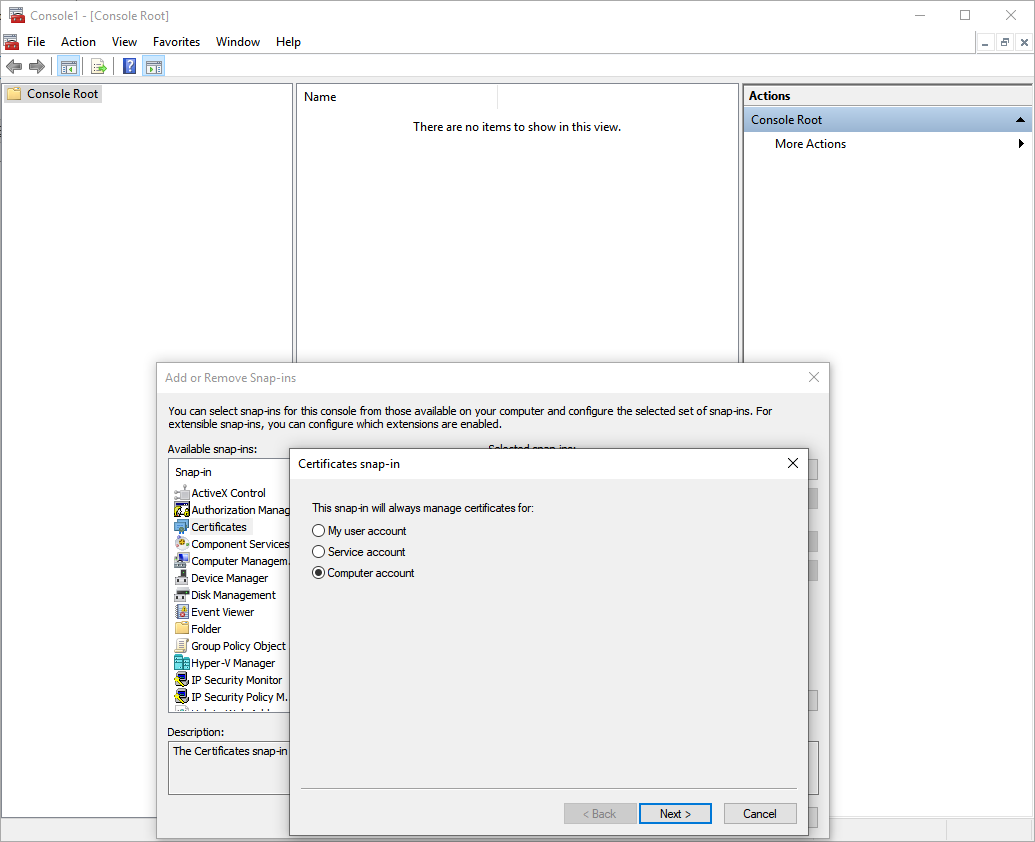
Next, open up the Microsoft Management Console

In the console, select "Add Snap-in", find the Certificate Snap-in and add it to the list, selecting "Local Machine" in the assistant
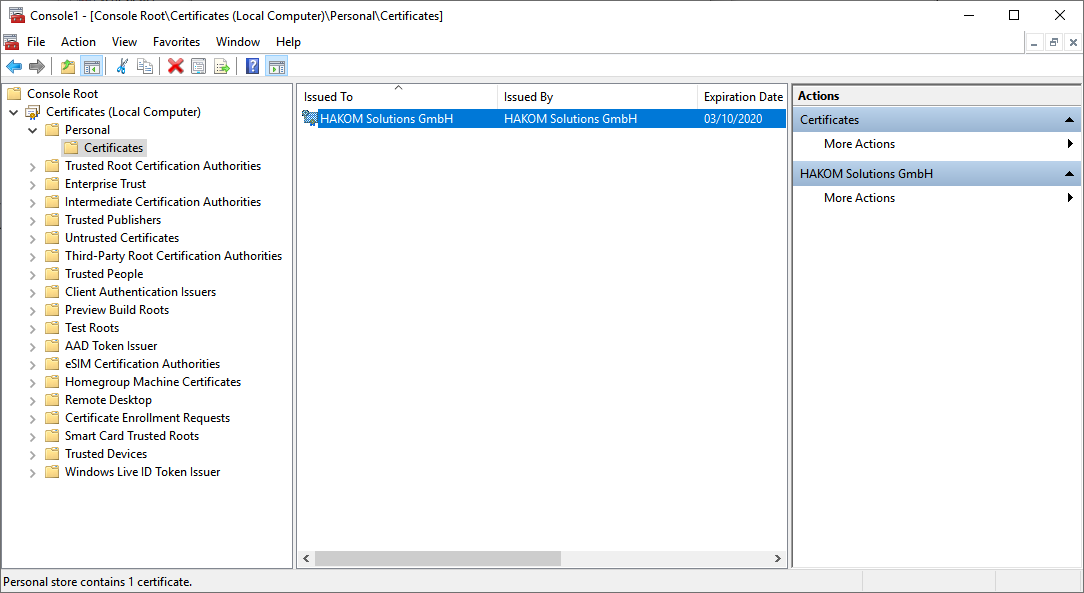
The certificate should now show up under "Own Certificates".
Double click on the certificate and open the "Details" tab.
Scroll down and select the "Thumbprint"
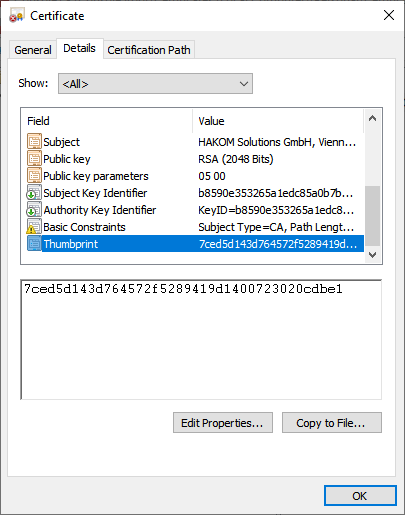
Copy the thumbprint value.
In the HAKOM.Config, enter the thumbprint:
<HAKOMConfiguration>
	<products>
		<WebTSMServices>
			<Authentication>
				<IntegratedIdentityProvider>
					<CertificateThumbprint>
						7ced5d143d764572f5289418d1400723020cdbe1
					</CertificateThumbprint>
				</IntegratedIdentityProvider>
			</Authentication>
		</WebTSMServices>
	</products>
</HAKOMConfiguration>
The WebTSM Services will now use this certificate.
Using an External Identity Provider (Azure Active Directory)
Configuring Azure
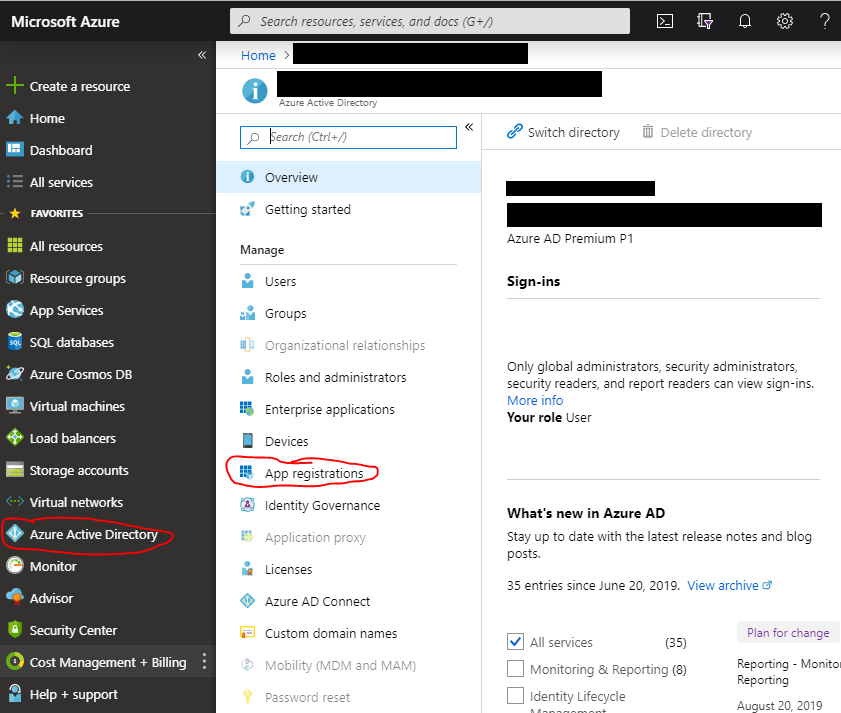
- Log into the Azure Portal
- Go to "Azure Active Directory"
- Select "App Registrations"
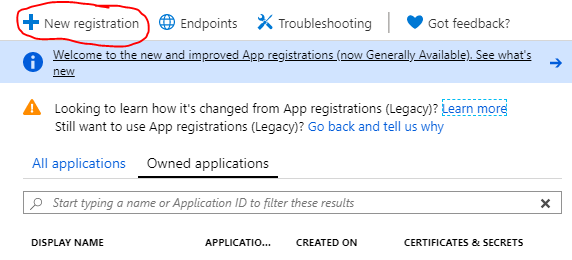
- Create a new registration
- Give your WebTSM Services instance a name and register the callback URI for interactive signin
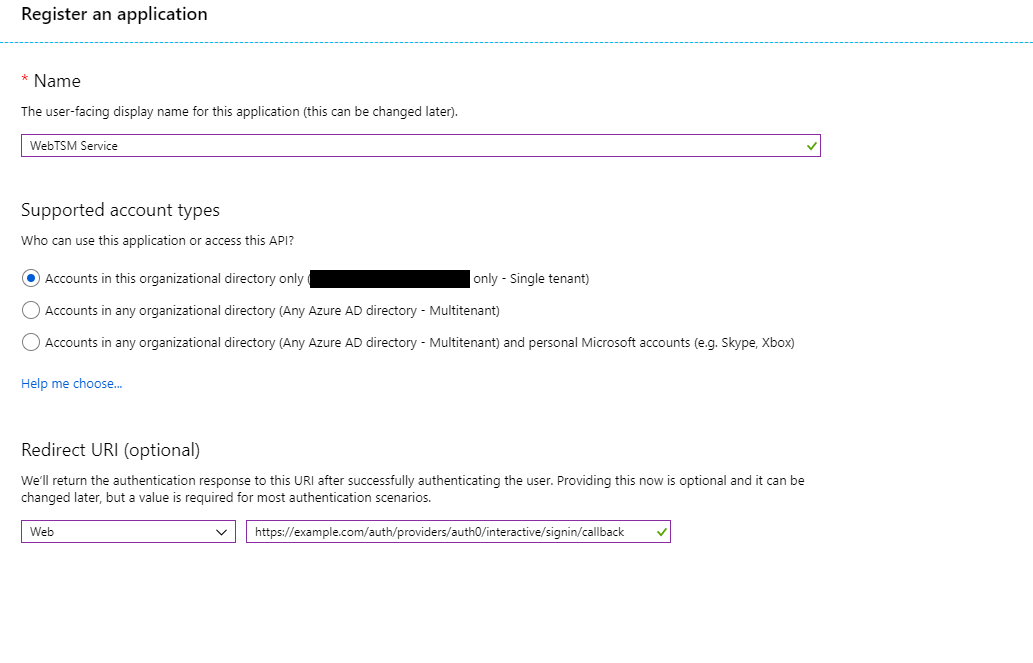
- The redirect uri can be changed later. It's also not necessary if you don't intend to use cookie authentication. If you don't want to use cookie authentication but still want to use implicit flow authentication from a web client, the redirect URIs must be set appropriatly which largely depends on the web client itself.
- After saving, you will have access to your applications client-id and tenant-id (which will be required for configuring the WebTSM Services themselves

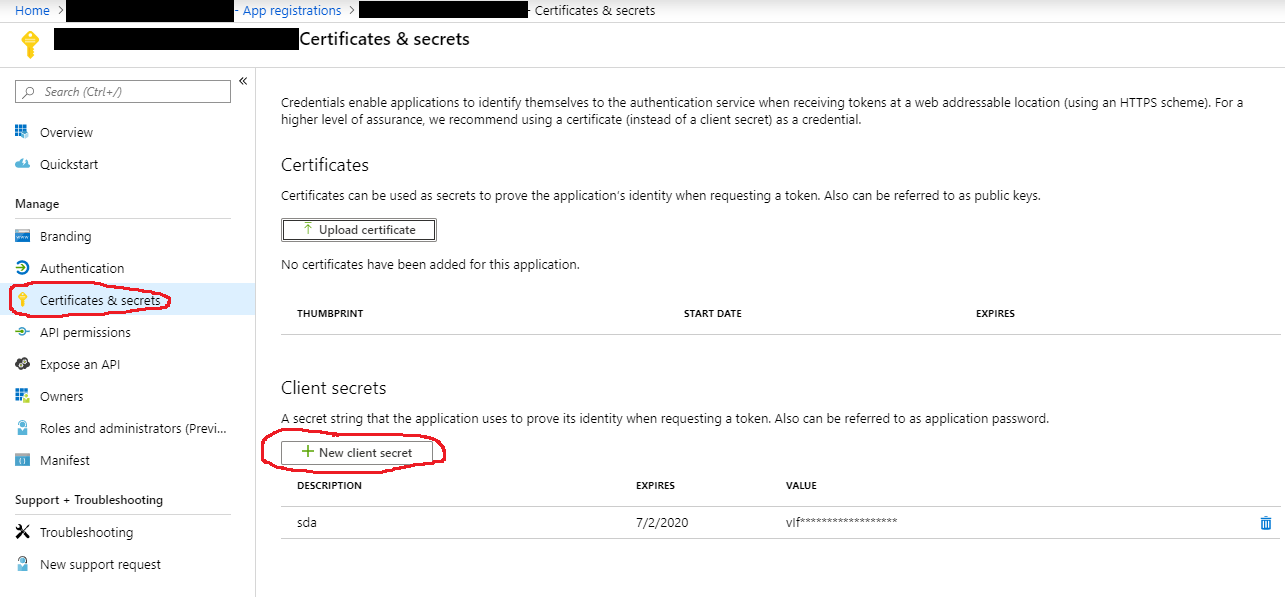
- Next, go to Certificates & Secrets and generate a new client secret (this is also required for configuring the WebTSM Services)
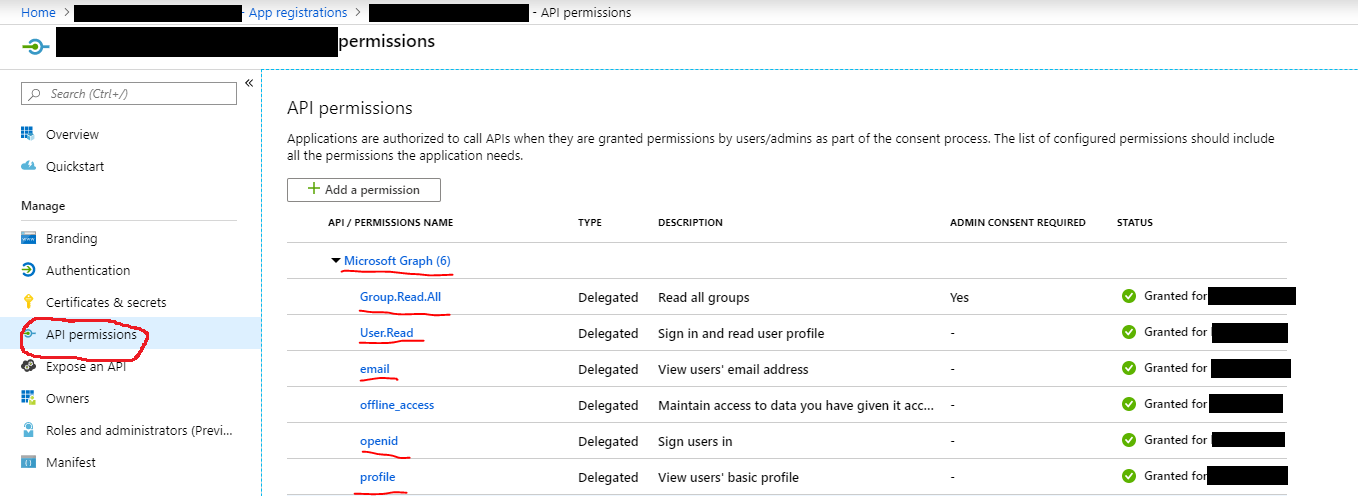
- Then, make sure you add the following permissions under "API permissions"
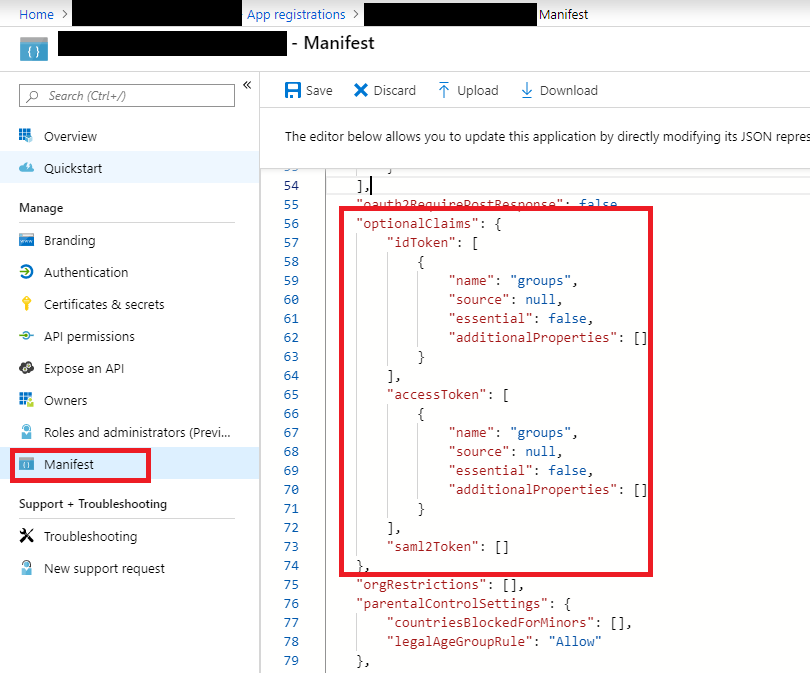
- Finally, configure the manifest to include the groups in id and access tokens
- Next, go back to the "Azure Active Directory" page, select "Groups" and create a new group.
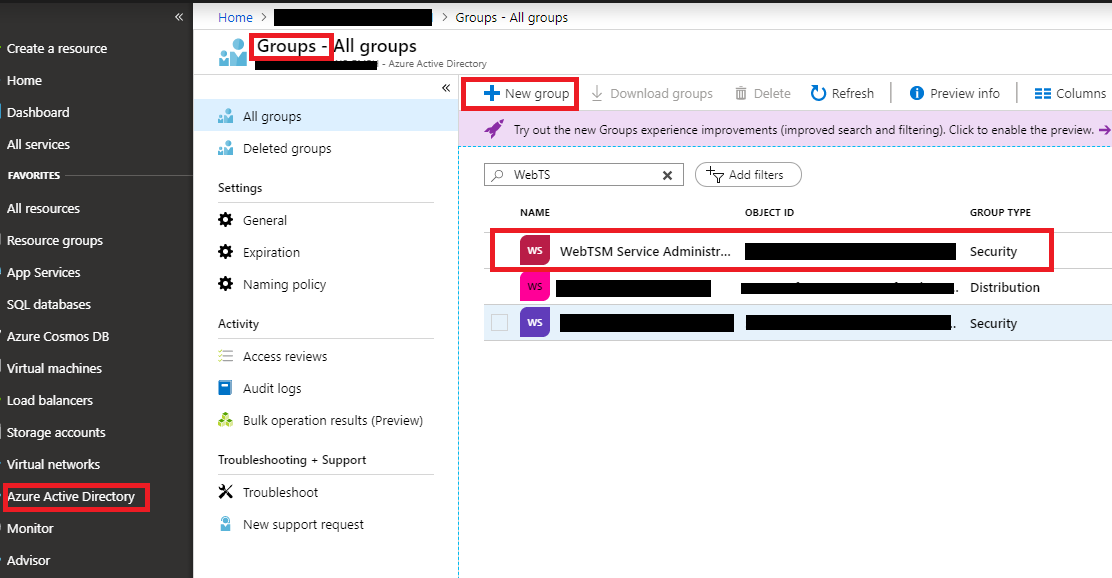
- Assign all users from your directory which should have access to the WebTSM Services to this group.
- Note the groups "object id". This will have to be configured in the WebTSM Services under <Scopes>
Configuring the WebTSM Services
This is an example that contains all the settings required to work with the Azure AD configuration from above
<HAKOMConfiguration>
	<products>
		<WebTSMServices>
			<Authentication>
				<IdentityProviders>
					<IdentityProvider>
						<Name>AzureAD</Name>
						<Help>https://docs.microsoft.com/en-us/azure/active-directory/develop/v2-oauth-ropc</Help>
						<Authority>https://login.microsoftonline.com/{INSERT-YOUR-TENANT-ID-HERE}/v2.0</Authority>
						<ClientId>{INSERT-YOUR-CLIENT-ID-HERE}</ClientId>
						<ClientSecret>{INSERT-YOUR-CLIENT-SECRET-HERE}</ClientSecret>
						<Configuration>https://login.microsoftonline.com/{INSERT-YOUR-TENANT-ID-HERE}/v2.0/.well-known/openid-configuration</Configuration>
						<Scopes>
							<Scope>openid</Scope>
							<Scope>profile</Scope>
							<Scope>email</Scope>
							<!-- Azure requires this to include additional group membership information in the token: -->
							<Scope>{INSERT-YOUR-CLIENT-ID-HERE}/.default</Scope>
						</Scopes>
						<ClaimMappings>
							<ClaimMapping From="groups" To="role">
								<ClaimValueMappings>
									<ClaimValueMapping From="{INSERT-YOUR-GROUPS-OBJECT-ID-HERE}" To="Administrator"/>
								</ClaimValueMappings>
							</ClaimMapping>
						</ClaimMappings>
					</IdentityProvider>
				</IdentityProviders>
			</Authentication>
		</WebTSMServices>
	</products>
</HAKOMConfiguration>
Using Active Directory Federation Services On-Premise (ADFS)
Requirements
- Windows Server 2016 (or greater)
- Activated Feature (ADFS) (See step 1 at https://docs.microsoft.com/en-us/office365/troubleshoot/active-directory/set-up-adfs-for-single-sign-on)
- WebTSM Services installation within the same network
Configuration of ADFS
In the following examples it is assumed that ADFS can be reached at
https://adfs.hakom.at/adfsThis should already be the case after installation and activation of ADFS.
Settings specific to certain environments (proxying with IIS or similar) cannot be covered in detail in this example. Please refer to the appropriate Microsoft documentation for ADFS for details.
If ADFS is set up correctly, calling
https://adfs.hakom.at/adfs/.well-known/openid-configurationwill return a JSON document which looks something like this:
{"issuer":"https:\/\/adfs.hakom.at\/adfs","authorization_endpoint":"https:\/\/adfs.hakom.at\/adfs\/oauth2\/authorize\/","token_endpoint":"https:\/\/adfs.hakom.at\/adfs\/oauth2\/token\/","jwks_uri":"https:\/\/adfs.hakom.at\/adfs\/discovery\/keys","token_endpoint_auth_methods_supported":["client_secret_post","client_secret_basic","private_key_jwt","windows_client_authentication"],"response_types_supported":["code","id_token","code id_token","id_token token","code token","code id_token token"],"response_modes_supported":["query","fragment","form_post"],"grant_types_supported":["authorization_code","refresh_token","client_credentials","urn:ietf:params:oauth:grant-type:jwt-bearer","implicit","password","srv_challenge","urn:ietf:params:oauth:grant-type:device_code","device_code"],"subject_types_supported":["pairwise"],"scopes_supported":["winhello_cert","vpn_cert","aza","openid","user_impersonation","allatclaims","profile","email","logon_cert"],"id_token_signing_alg_values_supported":["RS256"],"token_endpoint_auth_signing_alg_values_supported":["RS256"],"access_token_issuer":"http:\/\/adfs.hakom.at\/adfs\/services\/trust","claims_supported":["aud","iss","iat","exp","auth_time","nonce","at_hash","c_hash","sub","upn","unique_name","pwd_url","pwd_exp","mfa_auth_time","sid"],"microsoft_multi_refresh_token":true,"userinfo_endpoint":"https:\/\/adfs.hakom.at\/adfs\/userinfo","capabilities":[],"end_session_endpoint":"https:\/\/adfs.hakom.at\/adfs\/oauth2\/logout","as_access_token_token_binding_supported":true,"as_refresh_token_token_binding_supported":true,"resource_access_token_token_binding_supported":true,"op_id_token_token_binding_supported":true,"rp_id_token_token_binding_supported":true,"frontchannel_logout_supported":true,"frontchannel_logout_session_supported":true,"device_authorization_endpoint":"https:\/\/adfs.hakom.at\/adfs\/oauth2\/devicecode"}Registration of the WebTSM Services
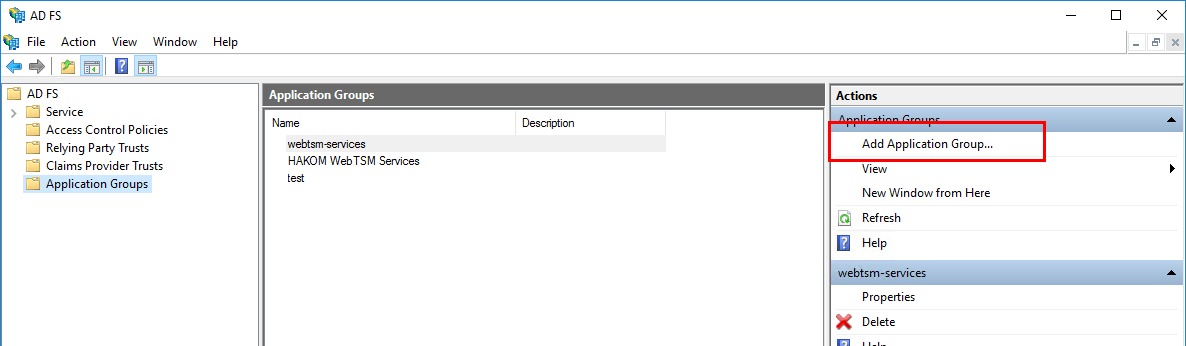
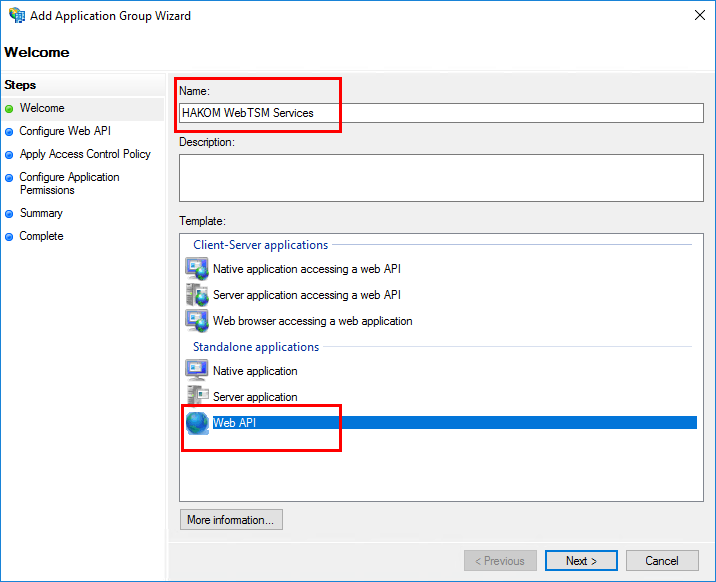
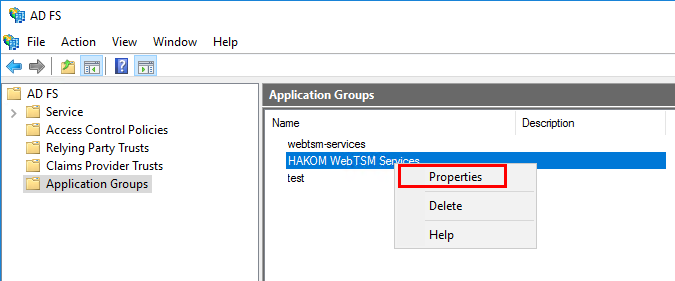
Adding a New Application Group
Name and Application Type
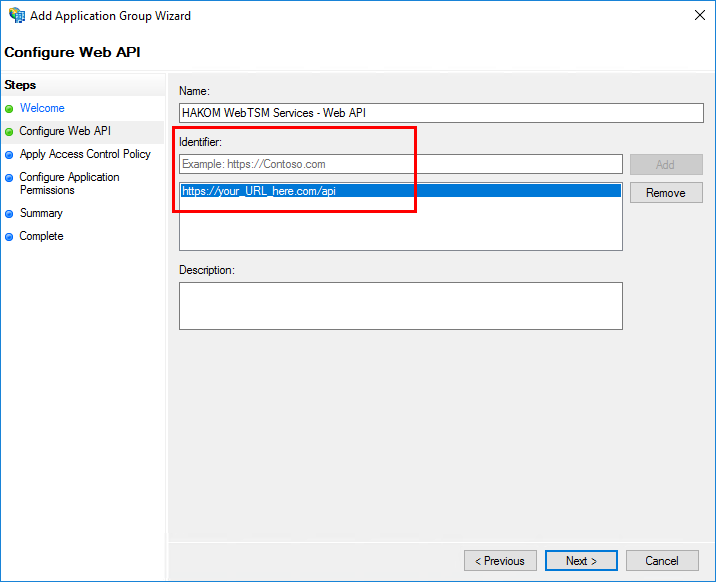
Service URL as Identifier
This depends on where the WebTSM Services are hosted.
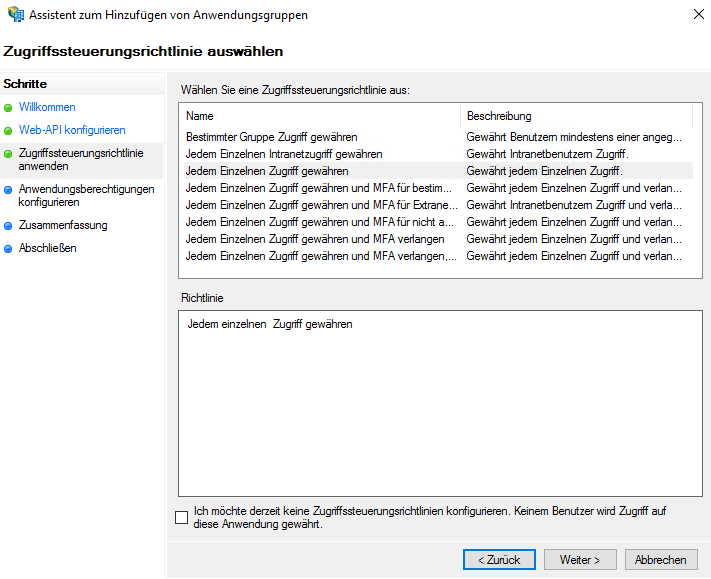
Configuring Access Control
If not requested otherwise, the default setting can be used here.
Completing the basic configuration of the application
This and the following page can simply be acknowledged with "Next".
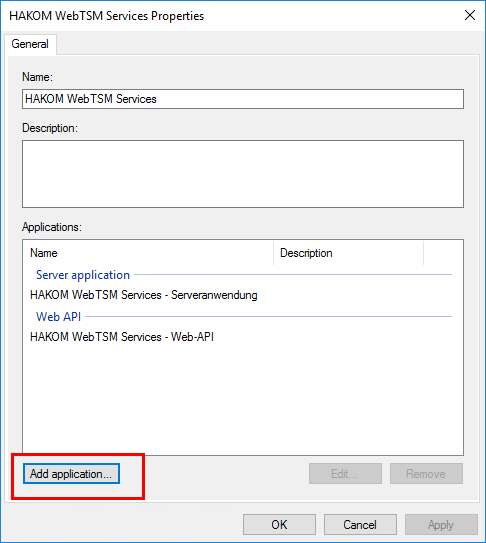
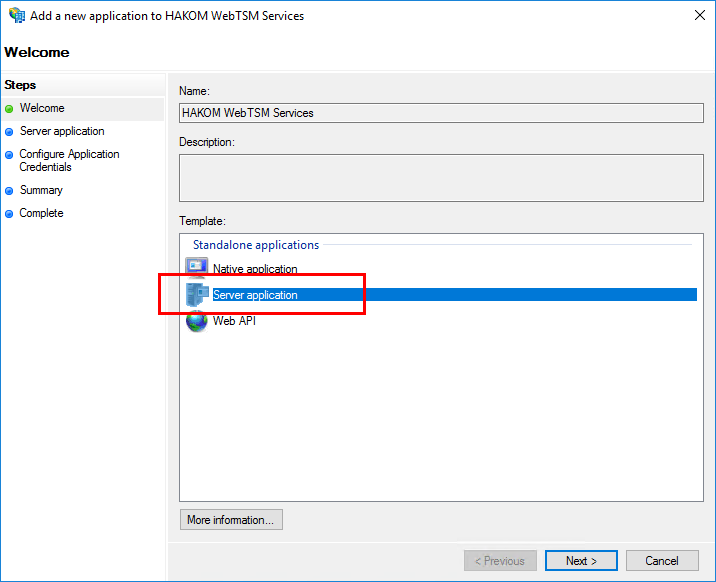
Add the WebTSM Services as Client Application
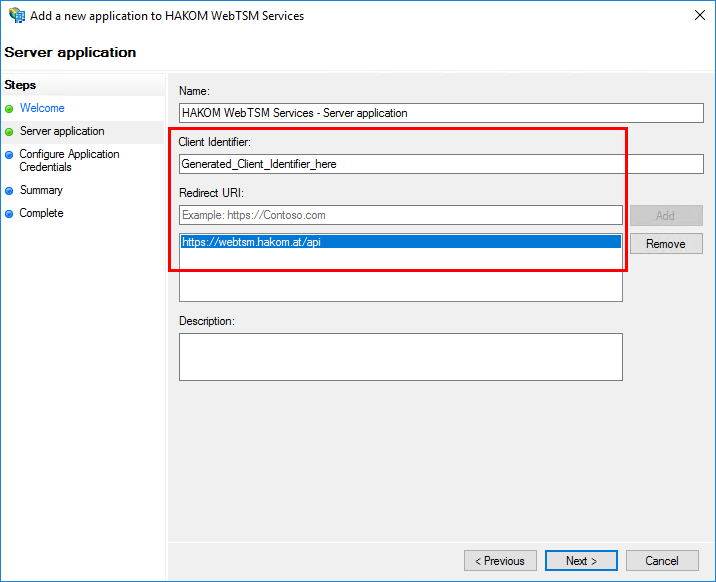
Generating Client ID and Configuring Valid Redirect URI
Configuring a redirect URI is only necessary if a login is to be enabled using redirects in the browser.
Configuring Keys for Tokens and Generating Client Secret
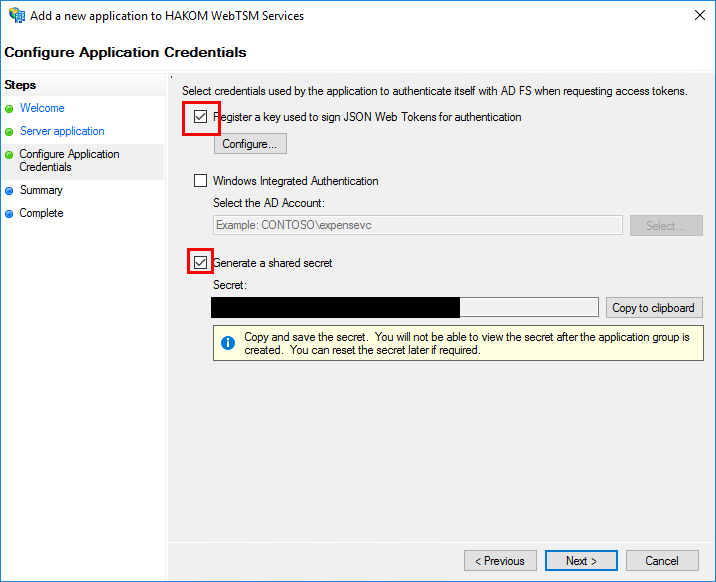
In "Summary" and "Finish" click on "Next".
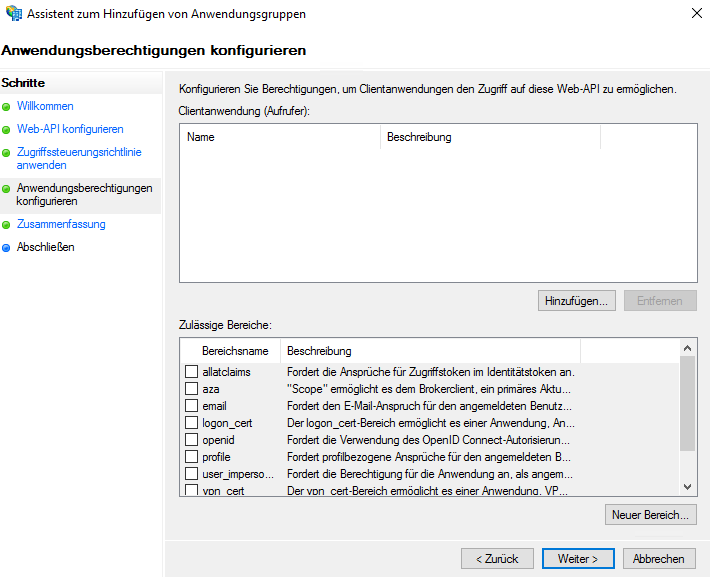
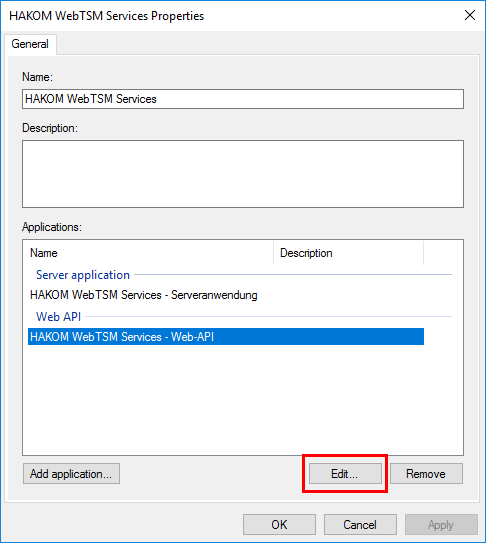
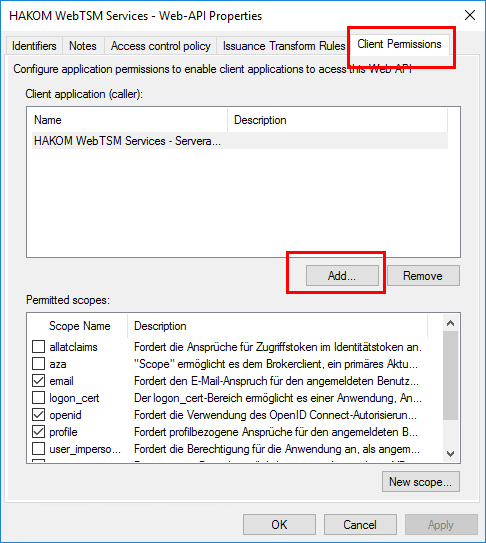
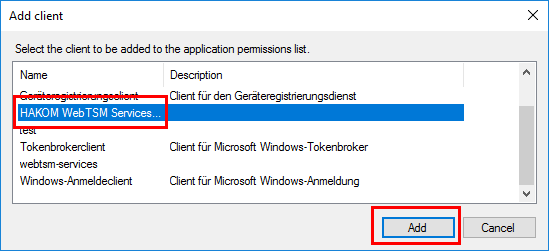
Connecting Applications and Configuring Scopes
Configuring the WebTSM Services
<HAKOMConfiguration>
	<products>
		<WebTSMServices>
			<Authentication>
				<IdentityProviders>
					<IdentityProvider>
  						<Name>ADFS</Name>
    					<Authority>http://adfs.hakom.at/adfs/services/trust</Authority>
    					<Configuration>https://adfs.hakom.at/adfs/.well-known/openid-configuration</Configuration>
    					<ClientId>6ca84acb-d7af-499c-8dd5-c4216c83f287</ClientId>
    					<Audience>urn:microsoft:userinfo</Audience>
					</IdentityProvider>
				</IdentityProviders>
			</Authentication>
		</WebTSMServices>
	</products>
</HAKOMConfiguration>
Note:
- Authority is (unlike with many other OpenID Connect providers) not the same path as the one under which the OpenID Discovery Document is provided.
Therefore Authority and Configuration must be specified separately. - Audience must be set to the value given in the code snippet above, otherwise validation of the tokens will fail.
- The value for ClientID is the one that was generated (or manually assigned) in the first step under Token Authentication .
Now a token can be generated under
https://adfs.hakom.at/adfs/oauth2/token(see "token_endpoint" under https://adfs.hakom.at/adfs/.well-known/openid-configuration)
This token is then sent to the WebTSM services within the Bearer Header. The user then receives roles, groups, etc. according to the configuration in the Active Directory.
Important Notes Regarding Cross Origin Resource Sharing
If you plan to allow untrusted client applications to use the cookie-based authentication method, there is an additional setting that must be configured.
By default, WebTSM Services are configured to allow web based applications hosted under any origin ([protocol]://[host]:[port]) to be allowed to make a request against the services. It does this by responding to OPTIONS preflight requests with an Access-Control-Allow-Origin header with a value of "*". Browser security standards, however prevent cookies to be included with requests across domains if the aforementioned header uses a wildcard ( * ). Therefore, enabling this method of authentication requires you to whitelist all individual hosts that are allowed to access the services.
Example CORS Configuration
<HAKOMConfiguration>
	<products>
		<WebTSMServices>
			<Cors>
				<Origins>
					<Origin>https://client.app.example.com:8080</Origin>
				</Origins>
			</Cors>
		</WebTSMServices>
	</products>
</HAKOMConfiguration>
Important Notes Regarding Authorization and Roles
Please note that the WebTSM Services currently only support a very rudimentary concept of authorization. Once a user is authenticated, read and write permissions are granted on all time series in a repository.
Deletion of time series however, requires the user to have a "role" assigned with a value of "Administrator".
In addition, the HAKOM ACL is still required (even when using an external identity provider) to grant access to individual repositories.
These limitations will be addressed in a future release but require special consideration, for now:
- For full access, the token from any identity provider must include a "role" claim, with a value of "Administrator"
- If the identity provider cannot be configured in such a way, use of ClaimMappings and ClaimValueMappings should be used to map existing claims present in the token appropriately
- The HAKOM ACL configured in the HAKOM.Config under (<BENUTZERVERWALTUNG>) must have an Administrator Role configured to have full access to repositories configured in the HAKOM.Config.
Example
Let's assume an identity provider (example.auth0.com) returns the following claims in an access token:
{
  "iss": "https://example.auth0.com",
  "sub": "8c050ed5-0214-4a1a-b9e3-24a56f8b7f78",
  "preferred_username": "John Doe",
  "groups": [ "webtsm service user group"],
  "email": "john.doe@example.com"
}
And lets assume the HAKOM.Config has repositories configured as such (actual connection strings are intentionally left out for clarity):
<HAKOMConfiguration>
	<dbconnections>
		<USERMANAGEMENT>
			<!-- insert connection information here -->
		</USERMANAGEMENT>
		<TSMREPOSITORY>
			<!-- insert connection information here -->
		</TSMREPOSITORY>
	</dbconnections>
</HAKOMConfiguration>
Then
The database configured under <USERMANAGEMENT>
- must have a role defined (Table: ACL_ROLE) with a name of "Administrator"
- must have a system object (Table ACL_SYSTEMOBJECT) with the same name as the repository (TSMREPOSITORY) and be defined with a PRODUCT_ID referencing a product called "TSM" (Table ACL_PRODUCT) as well as an object type with the name "DBVERBINDUNG" (Table ACL_OBJECTTYPE)
- must have the role "Administrator" assigned (via Table ACL_ROLEPERMISSION) to a permission (Table ACL_PERMISSION) with the action "*" (Table ACL_ACTION) and the system object as defined above
The HAKOM.Config for the WebTSM Services should have the identity provider configured as such:
<HAKOMConfiguration>
	<products>
		<WebTSMServices>
			<Authentication>
				<IdentityProviders>
					<IdentityProvider>
						<Name>example</Name>
						<Authority>https://example.auth0.com</Authority>
						<ClaimMappings>
							<ClaimMapping From="groups" To="role">
								<ClaimValueMappings>
									<ClaimValueMapping From="webtsm service user group" To="Administrator"/>
								</ClaimValueMappings>
							</ClaimMapping>
						</ClaimMappings>
					</IdentityProvider>
				</IdentityProviders>
			</Authentication>
		</WebTSMServices>
	</products>
</HAKOMConfiguration>
Causing the token from above to be interpreted as:
{
  "iss": "https://example.auth0.com",
  "sub": "8c050ed5-0214-4a1a-b9e3-24a56f8b7f78",
  "preferred_username": "John Doe",
  "role": [ "Administrator"],
  "email": "john.doe@example.com"
}
Which then tells the WebTSM Services (because of the mapping in the ACL tables) that the user has full access to the TSMREPOSITORY repository.