
Creating, Editing and Deleting Time Series
Creating a New Time Series
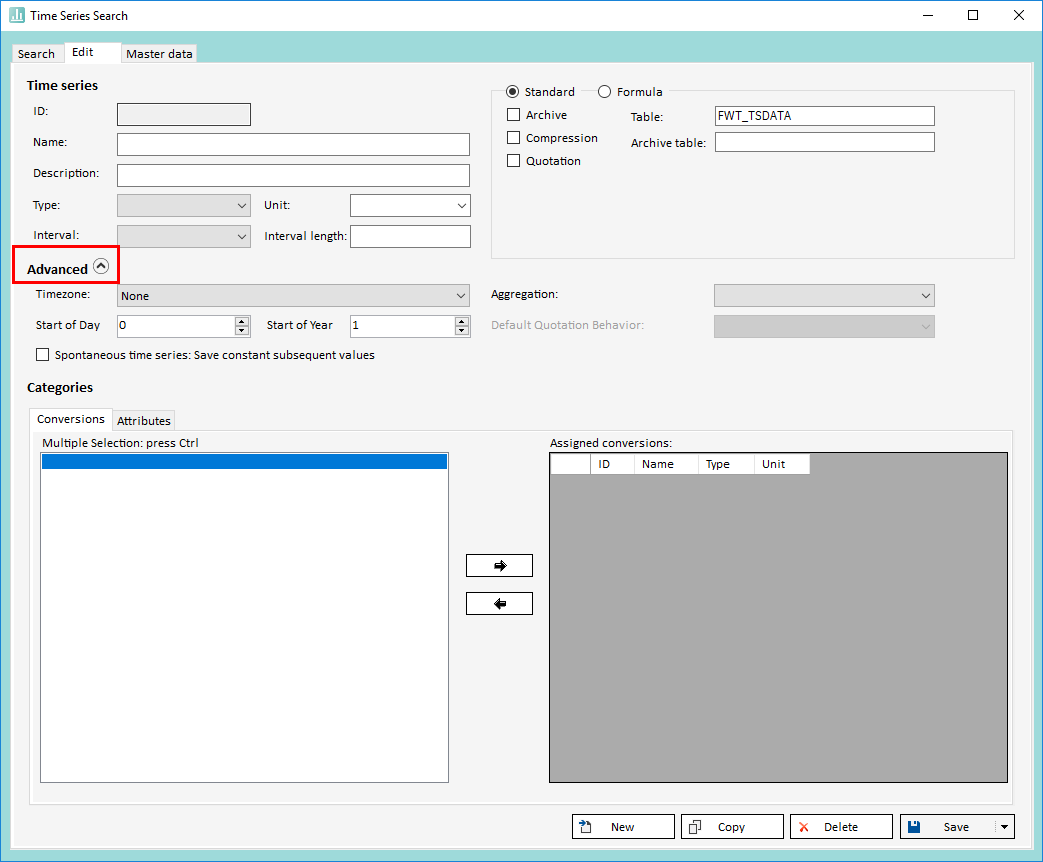
In order to create a new time series, first open the time series search window, then switch over to the "Edit" tab. If a time series was selected on the search tab, its data will be filled into the form. You can clear the form for a new time series by clicking on "New":
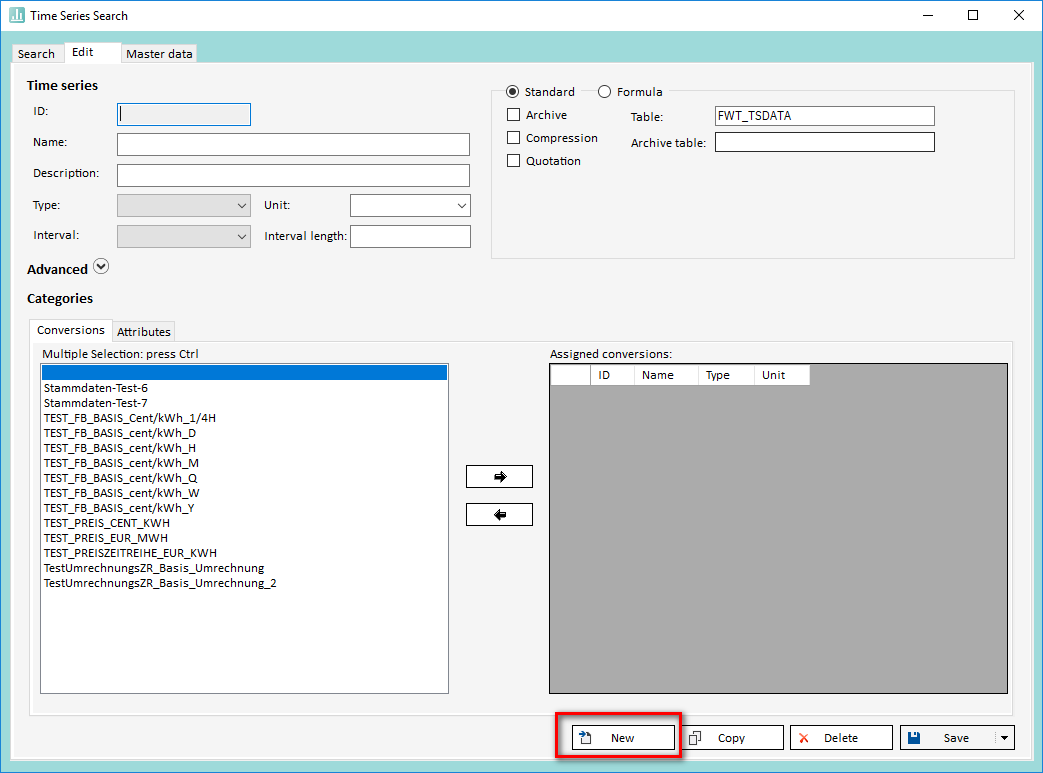
Afterwards the field "Table" is automatically filled with a default value. You may of course overwrite it. The following fields have to be filled:
- Name
- Unit
- Type
- Interval
- Interval lenght
- Archive table
All other fields, as well as the assignment of attributes/conversion time series are optional.
Save-options
- Archive
When this checkbox is active, data archiving is active. You can find further information regarding this feature under Audit. - Compression
This checkbox activates the compression function. This feature reduces the amount of data saved and the time for saving data by storing chunks of flag/value pairs binary coded into the value field. - Quotation
This checkbox activates the quotation feature. You can find further information regarding this feature under Quotations.
Depending on the save-option you have chosen the fields "Table" and "Archive table" will be filled with default data.
You have the possibility to change the default tables in the HAKOM.Config:
<HAKOMConfiguration>
	<products>
		<HAKOMFramework>
    		<settings>
        		<DefaultDataTables>
                		<DefaultTable></DefaultTable>
                		<DefaultArchiveTable></DefaultArchiveTable>
                		<DefaultVersionTable></DefaultVersionTable>
                		<DefaultVersionArchiveTable></DefaultVersionArchiveTable>
                		<DefaultCompressedTable></DefaultCompressedTable>
                		<DefaultCompressedArchiveTable></DefaultCompressedArchiveTable>
                		<DefaultQuotationArchiveTable></DefaultQuotationArchiveTable>
                		<DefaultQuotationCompressedArchiveTable></DefaultQuotationCompressedArchiveTable>
            		</DefaultDataTables>
    		</settings>
		</HAKOMFramework>
	</products>
</HAKOMConfiguration>
If theses tags are not present or do not contain a value, the HAKOM default tables will be applied.
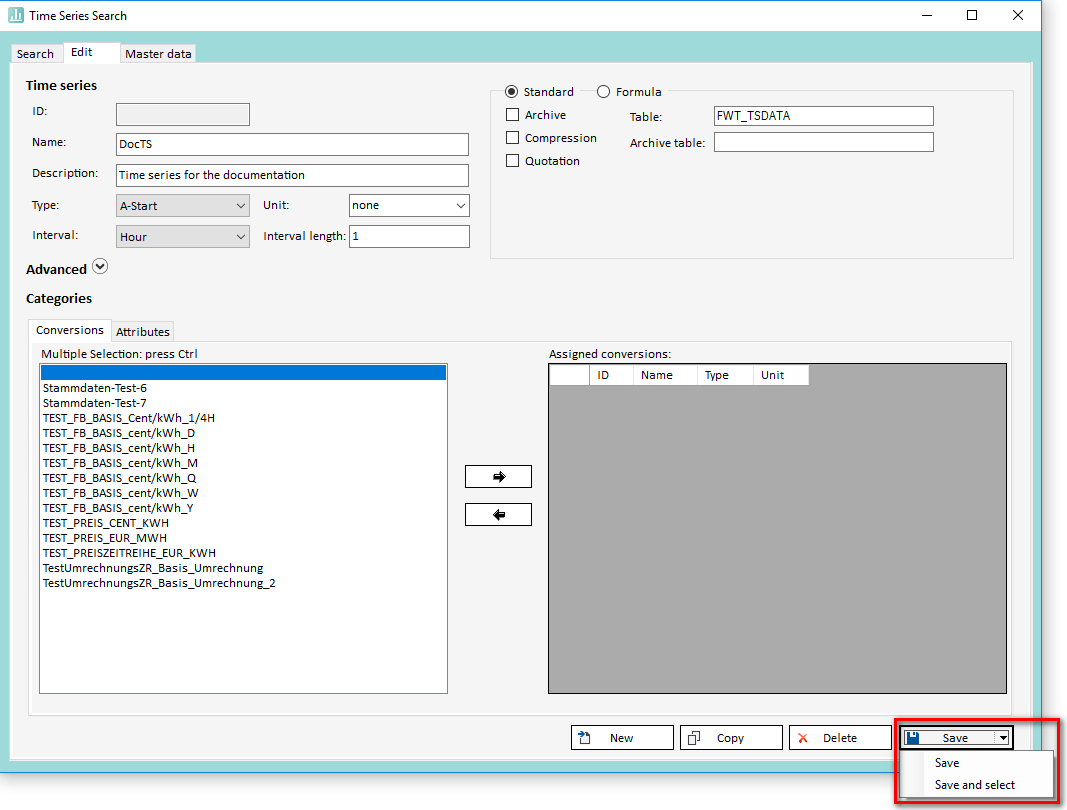
Saving time series
Saving a time series can be done in two ways, either by clicking directly on the "Save" button or by clicking on the small arrow next to this button (see illustration below). This opens a menu that allows you to choose between two options:
- Save
Same effect as clicking directly on the "Save" button. - Save and select
Saves the time series and selects it directly in the time series search.
Editing Existing Time Series
Editing a time series starts with selecting the target time series in the "Search" tab, then switching over to the "Edit" tab. All settings for the selected time series are automatically filled into the form. After having made changes, click on "Save".
to persist the modified time series to the data base.
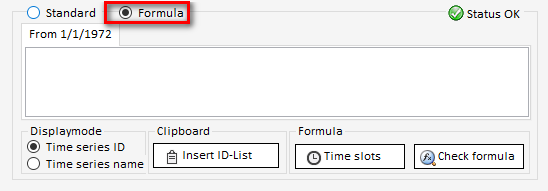
Editing Formulas
When creating or editing a time series, you may chose to either create a "Standard" time series, or a "Formula" time series. Selecting the latter displays additional fields for entering and validating the formula that should be used to generate the data for the time series.
Attributes and Conversion Time Series
A time series can be assigned any number of conversion time series as well as attributes.
Assigning conversion time series
Choose a time series from the list and click on ![]()

By clicking on "Save" your changes will be saved.
Remove an assigned conversion time series
Select the conversion time series that should be removed from the assigned conversions and click on the ![]()
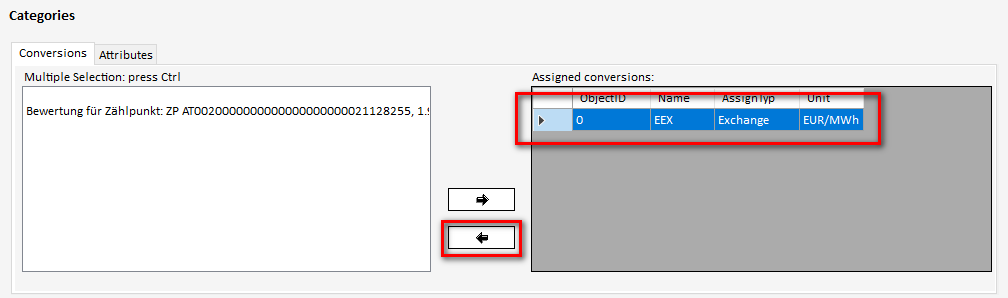
The selection will be removed from the area "Assigned conversions".
By clicking on "Save" your changes will be saved.
Master data
System Attributes
Every time series has an additional set of optional system attributes.
These are:
| Name | Description | Possible Values | Default Value |
|---|---|---|---|
| Time zone | Links a time series data to a time zone. This can influence how data is read/written, especially during transitions from and to daylight savings times. | A list of all supported time zones can be found here: Reading Data into Excel | None |
| Start of day | Defines the hour which designates the beginning of a day. | 0-23 | 0 |
| Start of year | Defines the month that designates the beginning of a year. | 1-12 | 1 (January) |
| Rule for aggregations | Controls how data is aggregated accross time. This may be defined by its assigned unit (i.e. average for temperatures, etc). Setting this value overrides the aggregation rule derived from the unit for this particular time series. |
| null |
| Default behavior for quotations | Specifies how data should be read from quotation time series. This overrides the behavior configured as default in the HAKOM.Config configuration file. This only applies to quotation time series. For more information on that particular type of time series, please refer to this page: Quotations |
| null |
| Save constant subsequent values | Specifies whether values that do not change should be saved each time they occur continuously (yes) or whether values should only be saved when they change relative to the previous one. This only applies to spontaneous time series |
| No |
These values can be set by expanding the "Advanced" section in the "Edit" tab.
Attributes
The attribute administration offers specification possibilities for attributes, units and selective lists:
Creating, editing and deleting attributes
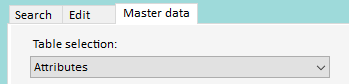
Creating an attribute is done via the "Attributes" in the "Table selection" - drop down:
To create a new attribute a name, a description and a datatype have to be entered in the empty last row of the table. To save the new attribute, simply klick into another row and an ID will show up in the left column.
To edit an existing attribute you have to click into the cell that you want to edit and change the values. To save the changes simply klick into another row .
To delete an attribute klick on the black arrow to the left of the tablerow. This highlights the whole row. Hit the DEL-Button and confirm your intention to delete the attribute.
Assignment Unit → Attribute - Step by Step
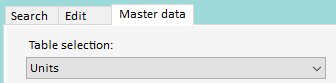
First select the unit table in the "Master data" tab:
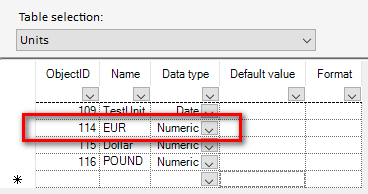
The unit "EUR" of the type "Numeric" is created:
Next, values are assigned to the unit:
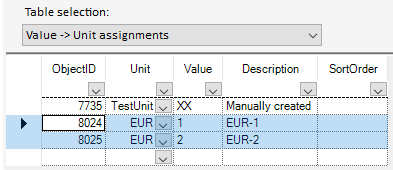
Finally the unit is assigned to an attribute:
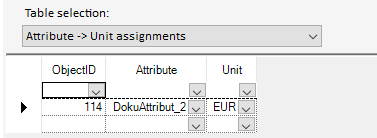
After assigning an attribute, which was assigned a unit, to a time series it is possible to apply a unit and a value to this attribute for this time series:

Datatypes of attributes
Date
This datatype represents a date.
When assigning a value to a date attribute from within the TSM GUI, it is possible to do this in ISO 8601 standard or any format accepted by Excel (Exceptions to this are the following formats: DD.abbrevation_of_month., First_letter_of_month, First_letter_of_month YY).
Assignment via Master Data import requires the value to be in ISO 8601 format. This format is also required when you want to use the date value within a formula time series.

All the formats mentioned above are valid.
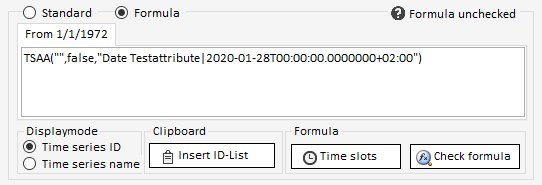
Only ISO 8601 is valid.
List
A List attribute represents a selection in form of a drop down menu, which has been configured in the Master data tab of the TSM Search. After assigning a list attribute to a time series a unit and one of the associated values can be chosen:

In this example the time series was assigned the attribute "List Testattribut" with the unit "EUR" and one of its values.
To assign a List attribute to a time series via Master Data Import, the units value has to be entered in the Attributs column:

In this example the attribute "List Testattribut" was assigned a unit, which can have the values "1" or "2".
Due to a bug, assignments done via Master Data import are not visible in the time series definition in the "Edit"-Tag.
To make use of a List attribute in a Formula, you have to fill the value of the unit in, as shown below:

This time series forms an aggregat over ALL time series, which have been assigned "List Testattribut" with the value "1". That means, the result is an aggregation over possibly more than one unit, if they share the same value.
A short example:
You have the attribute "List_X".
List_X was assigned two units: "Consumption" and "Commodity".
Both of these units were assigned a value "Gas".
If TS_1 was assigned Consumption and TS_2 was assigned Commodity both with the value Gas and TS_3 forms an aggregate using Gas as value, the result contains both TS_1 and TS_2.
MultiChoice
Attributes of the type MultiChoice are similar to List attributes, but unlike List attributes they can be assigned multiple values:

The syntax for using MultiChoice attributes in Formulas looks as follows:
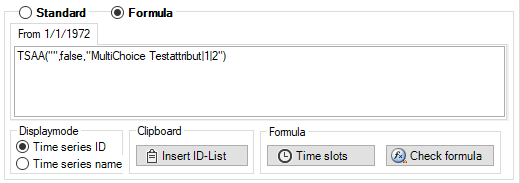
Multiple values are seperated by "|".
Replacing part of the search string with a wildcard also works. For example, the following formula "TSAA("",false, "MultiChoice Testattribut|%Upper Austria%")" yields an aggregate of all time series to which "Upper Austria" and possibly other values have been assigned (e.g.: "Lower Austria|Upper Austria", "Upper Austria| Vienna", etc.).
MSCONSID
With an attribute of type MSCONSID an MSCONS ID (and an Edis code) can be assigned to a time series. Through this assignment an MSCONS file can be imported either manually or automatically via the Interface Plug-in.
Node
A Node attribute represents the root of a tree. Once the root was created children can be added or removed via Master data import.
To do so, you have to export the root node via Master data export. Then you can add child nodes as shown below:
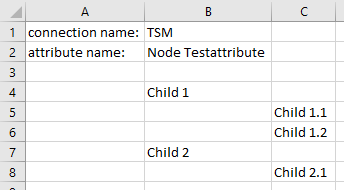
After the child nodes have been imported, they can be assigned to a time series either through TSM Search GUI or Master data import:

Assignment via TSM Search GUI

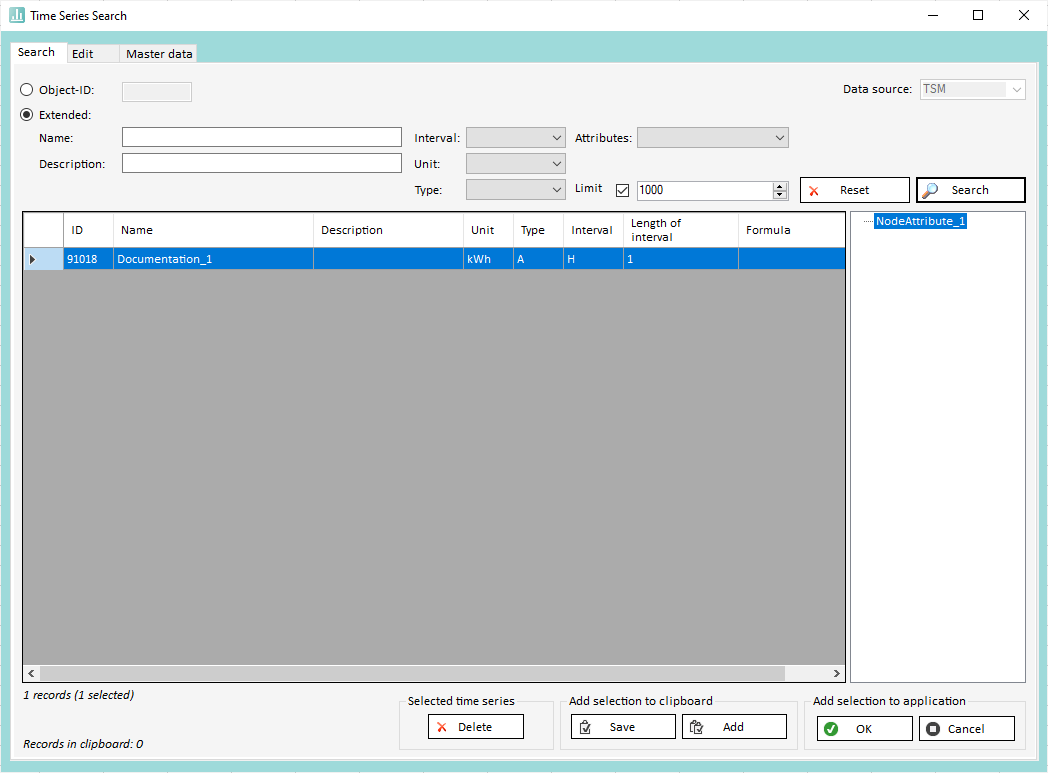
When Searching for time series, Node Attributes can serve as search criteria:
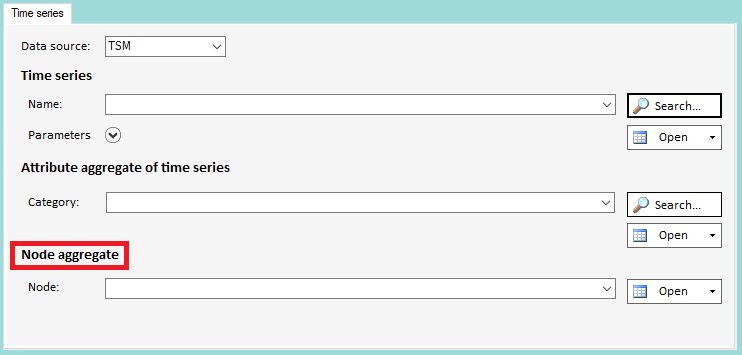
To aggregate time series data based on a node attribute use the node aggregate function in the time series plug-in:
Numeric
This datatype represents a numeric value and is used in a Formula as follows:

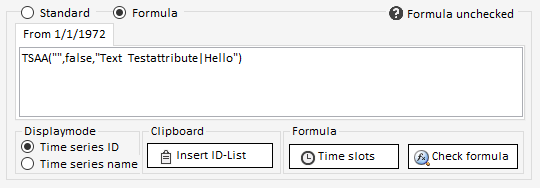
Text
This datatype represents a text and is used in a Formula as follows:
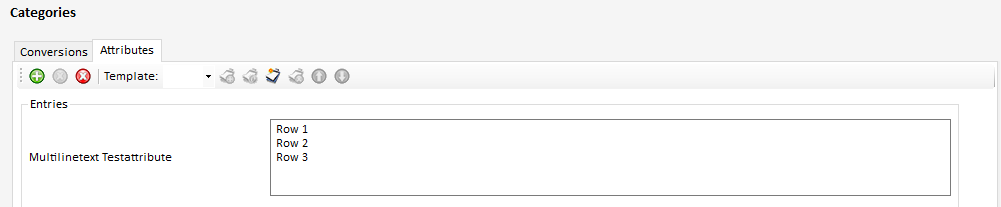
Multilinetext
Similar to a Text type attribute an attribute of type Multiline Text contains strings, but can take several lines. To start a new line hit Ctrl + Enter.
Timeseries
Attributes of the type "Time series" contain time series. The syntax to make use of this type in formulas looks like this:
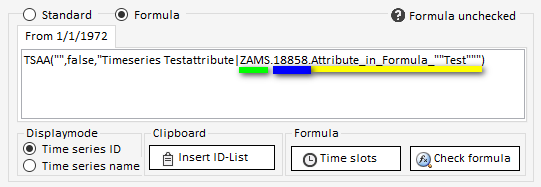
- Green: Name of the database connection
- Blue: ID of the time series
- Yellow: Name of the time series
In this example the name of the time series contains quotation marks. To process these, for each quotation mark in the name, another one has to be added in the formula.
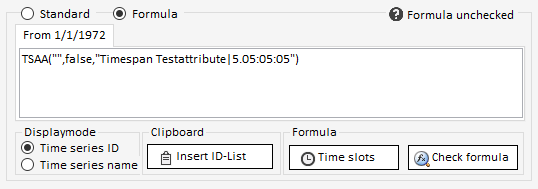
Timespan
This datatype represents a timespan. When assigning an attribute of this type to a time series the timespan can be set directly via buttons. In a formula or in an Excel sheet for a Master data import the value of the attribute is set like this:
D.HH:MM:SS
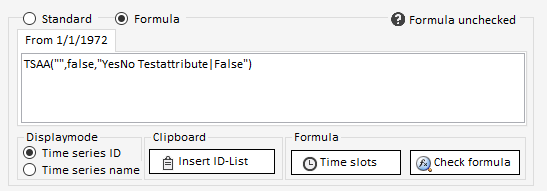
YesNo
An attribute of YesNo type represents a Boolean. When assigning an attribute of this type to a time series you can set its value to either "Yes", "No" or "Not setup".
To use it's value in a formula, set it to "True" or "False" like below:
For the import via Excel you have to write TRUE ("yes") or FALSE ("no") in the corresponding line:

If you want to change the value of the attribute via the master data import to "Not set", you have to leave the respective cell empty and import it with the option "Import also blank attribute entries".
Note
For now the only formula in which you can use attributes or their values (besides Node aggregate) is the TSAA-formula. You may write your own formulas using EvalComponents.
Attribute Assignment
Attributes can be assigned to time series either manually or via attribute templates in the edit tab in the Time Series Search GUI.
Assign manually
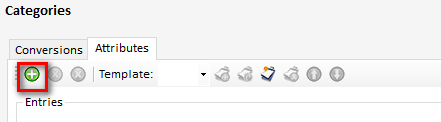
To assign one or more attributes manually klick on the green "+" symbol:
A window will open in which you can select the desired attributes. Confirm the selection with "OK".
Depending on the type of the chosen attributes.
Assign attributes via attribute template
If a time series was assigned one or more attributes a new attribute template can be created by clicking the button "New template":
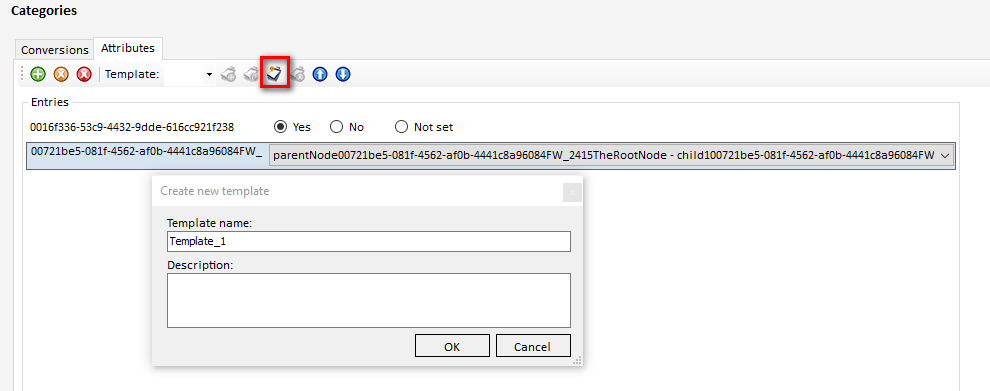
After confirmation, the template is listed in the drop down "Template". There are two options to assign an attribute template to a time series:
- "Add template": adds the attributes of the template to the already assigned attributes.
- "Switch template": removes the assigned attributes and assigns the one from the template

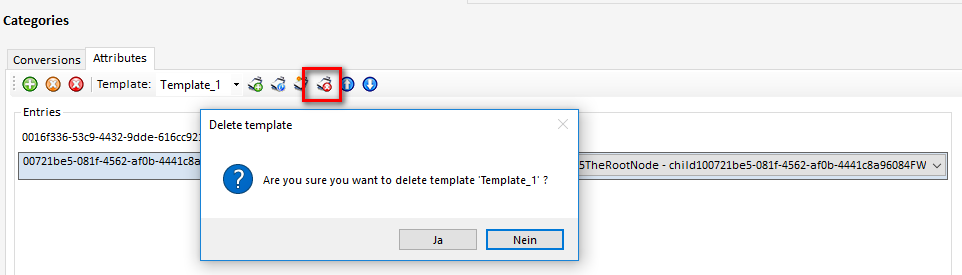
A template is deleted by clicking on the button "Delete selected template":
Reading attributes into an Excel template
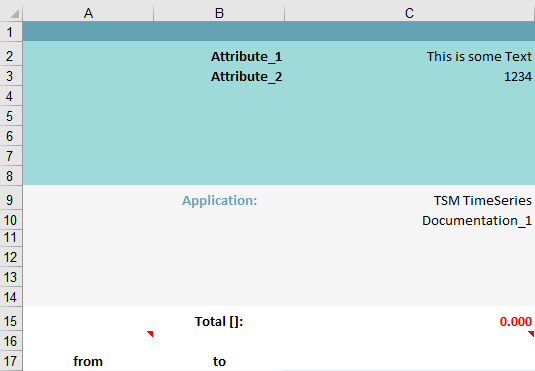
Cells B2 and B3 of the Excel template are reserved for attribute names. If a time series was assigned an attribute you can see its value by writing the attributes name in one of the cells and then click "Update".
Timeslices on Attributes
It is now possible to create timeslices on attributes via Master-Data-Import.
To achieve this, follow the instructions below:
The time series on which you want to create a timeslice on an attribute is exported as usual.
Each Attribute assigned to this time series is displayed in a separate column. Depending on wether you want to create timeslices on an attribute or category you have to use one of the two following patterns, since Categories can either be true or false, but attributes can have varying values:
Therefore, if it is an attribute, changes are to be made in the column of the attribute according to the following scheme:
<AttributeSlots>
	<Slot>
		<ValidFrom>1972-01-01T00:00:00+01:00</ValidFrom>
		<Value>Value 1</Value>
	</Slot>
	<Slot>
		<ValidFrom>2017-08-08T00:00:00+02:00</ValidFrom>
		<Value>Value 2</Value>
	</Slot>
</AttributeSlots>
One slot represents one timeslice. The value within the value-tags is valid until the next timeslice.
After importing the time series it is not possible to see these values in the Search-GUI for now. Instead the text field is empty.
Changes to a category must be made according to the following schema:
<AttributeSlots>
	<Slot>
		<ValidFrom>1972-01-01T00:00:00+01:00</ValidFrom>
		<Value>true</Value>
	</Slot>
	<Slot>
		<ValidFrom>2017-08-08T00:00:00+02:00</ValidFrom>
		<Value>false</Value>
	</Slot>
</AttributeSlots>
True: The Category applies until the next Timeslice's value is "false".
False: The Category does not apply until the next Timeslice's value is "true".
Deleting Time Series
In order to delete one or many time series, select them from the list within the "Search" tab, then click on the button "Delete".